Lissa Anglin • Part of Me Blog

Art, décor, family and photography- it's all part of me!

Anglin Abode Reveal: Pantry Organization with my sidekick Cricut Joy

AnglinAbode, CRAFTS, DIYlissa-anglinComment

This post has been sponsored by Cricut, who has enabled me to create the custom pantry of my dreams!


I never would have guessed that one of the first “reveals” I’d share of our new home would be the pantry- but here we are! And it really makes sense- with a family of 5- I had no other choice than to attack the pantry and get it in order before chaos ensued. I ended up finding some really cool organizational items and creating some custom labels in a pinch with my Cricut Joy (tutorial below!).

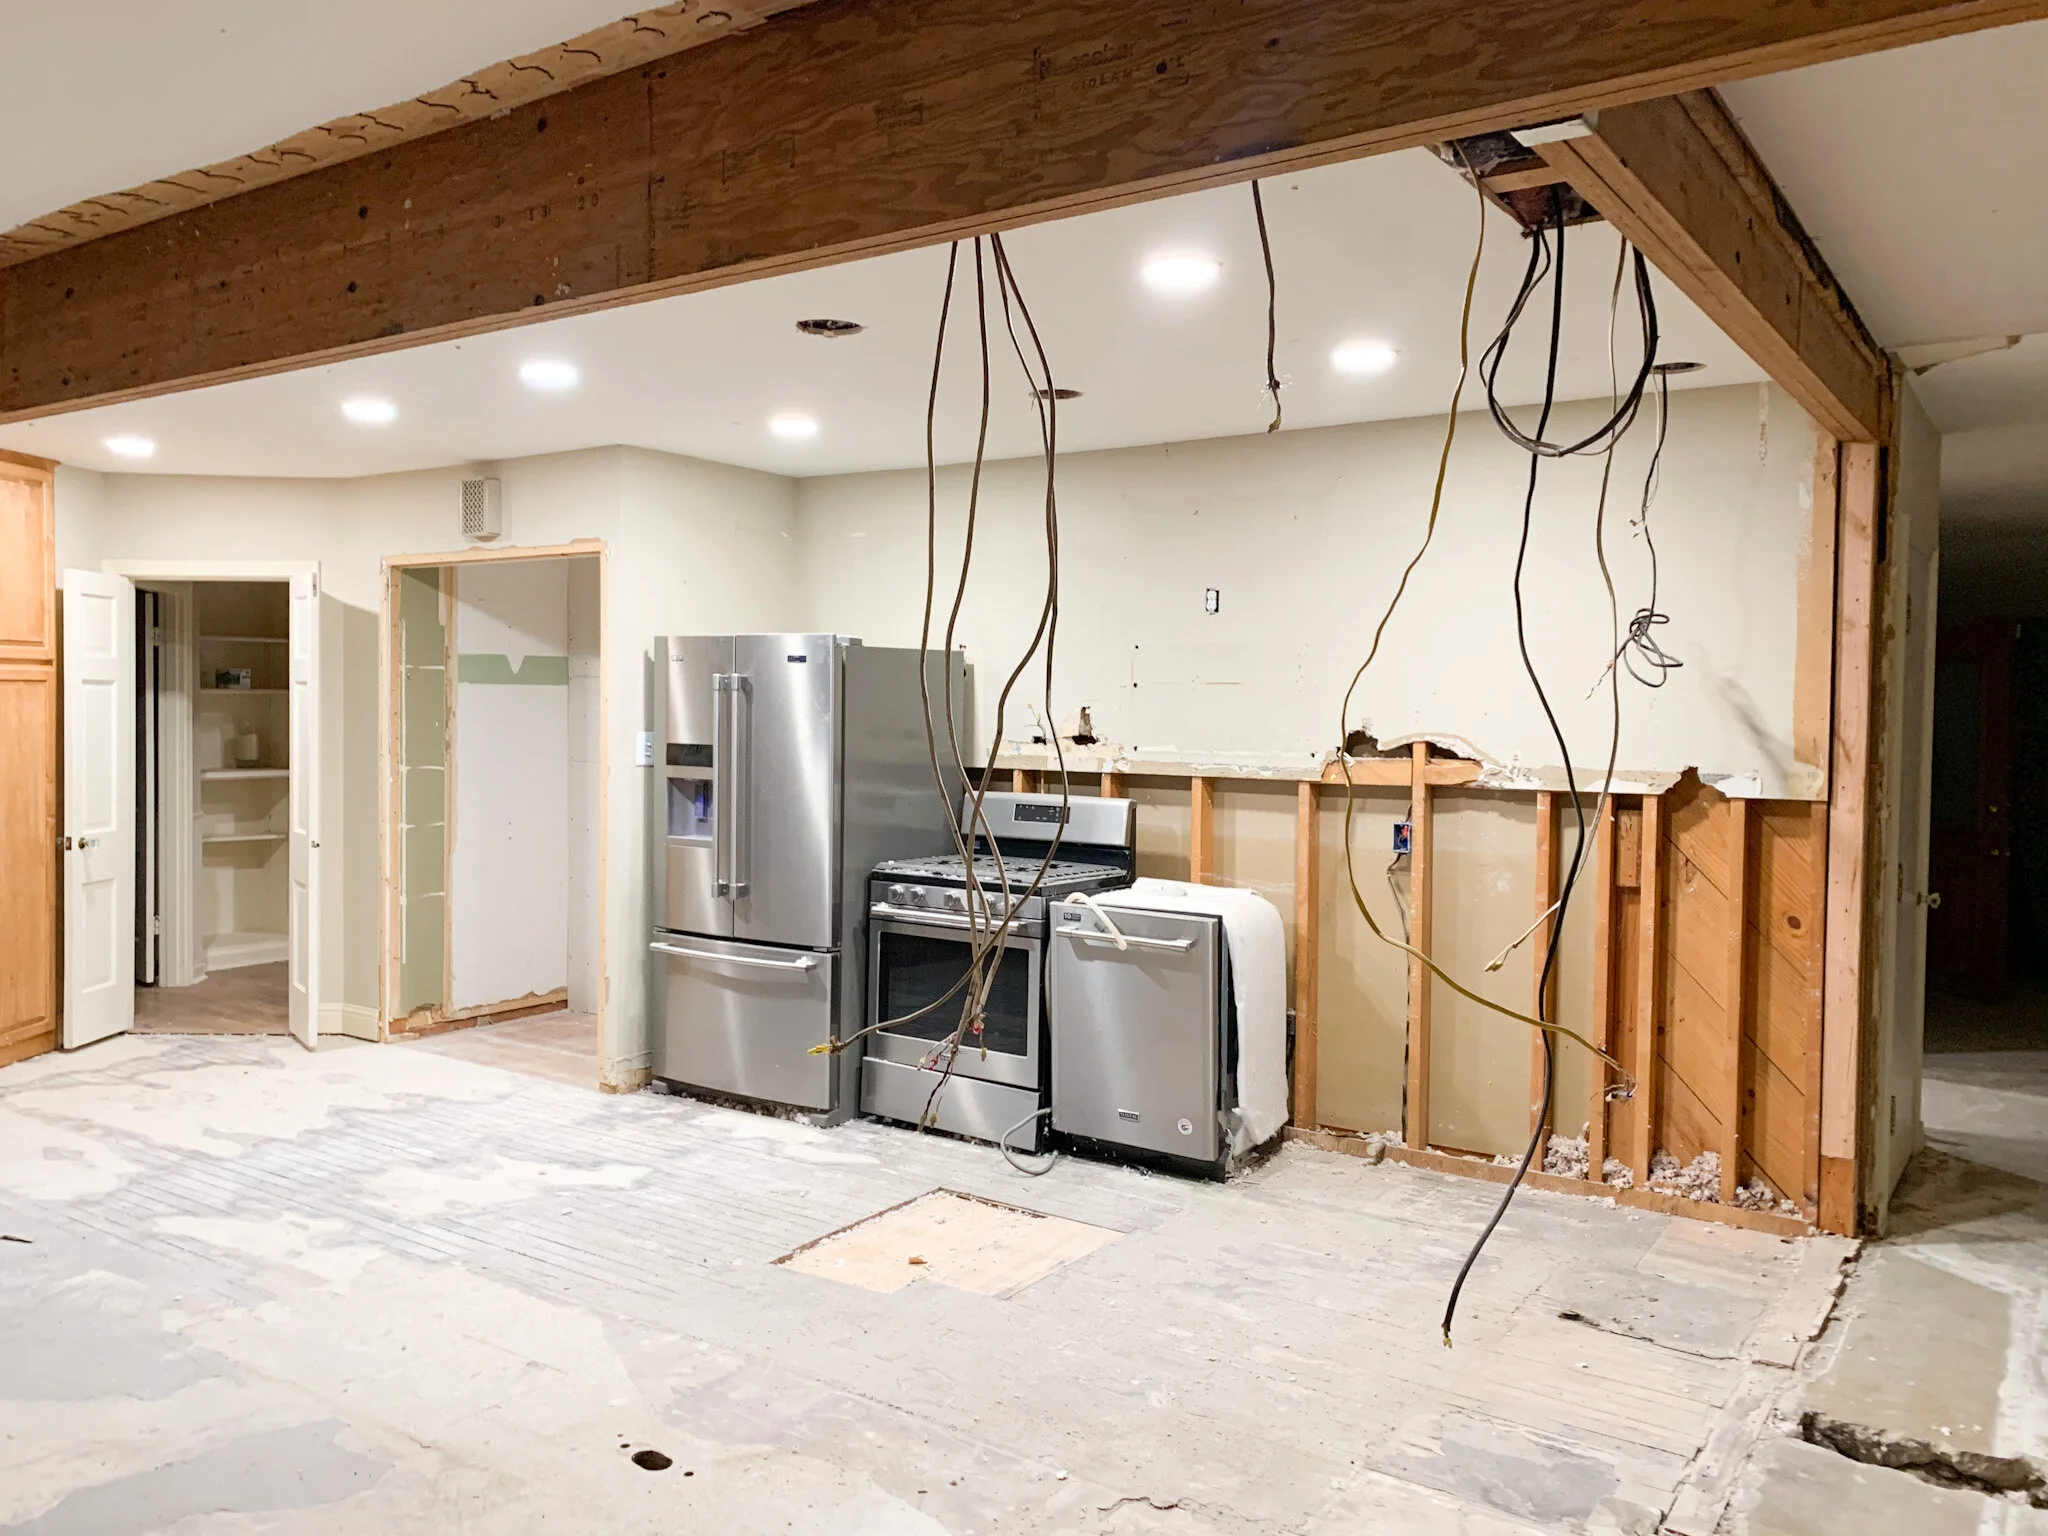
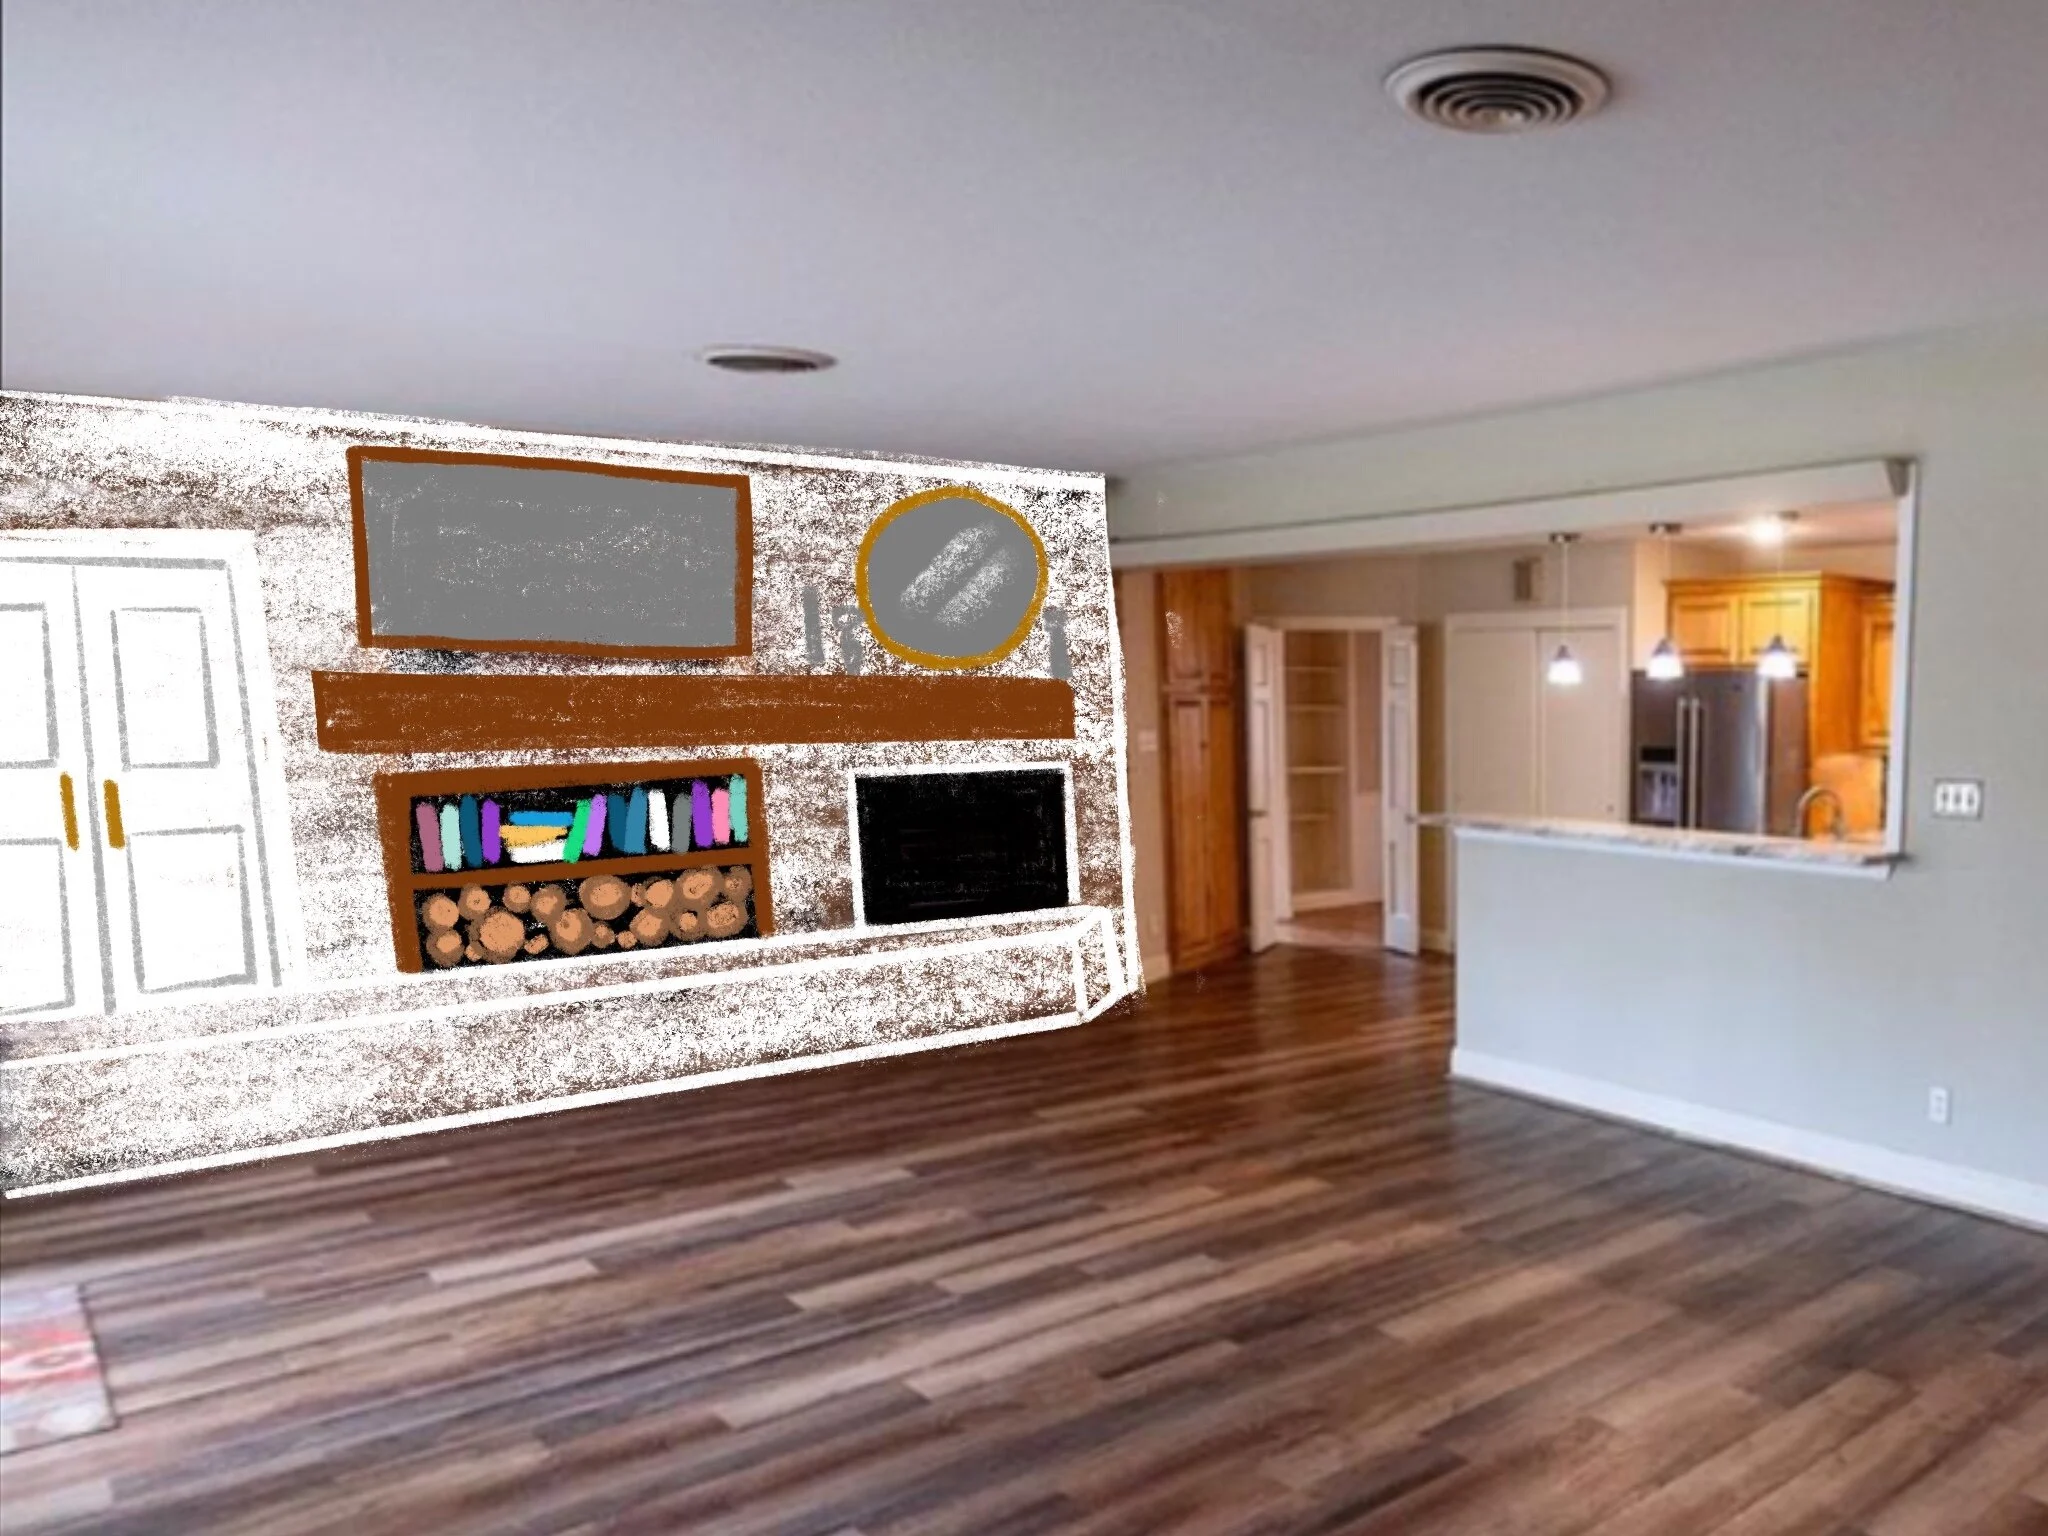
Let’s take a quick second to remember the pantry (or lack thereof) that our house had when we first bought it:

320822ndSt-8861.jpg

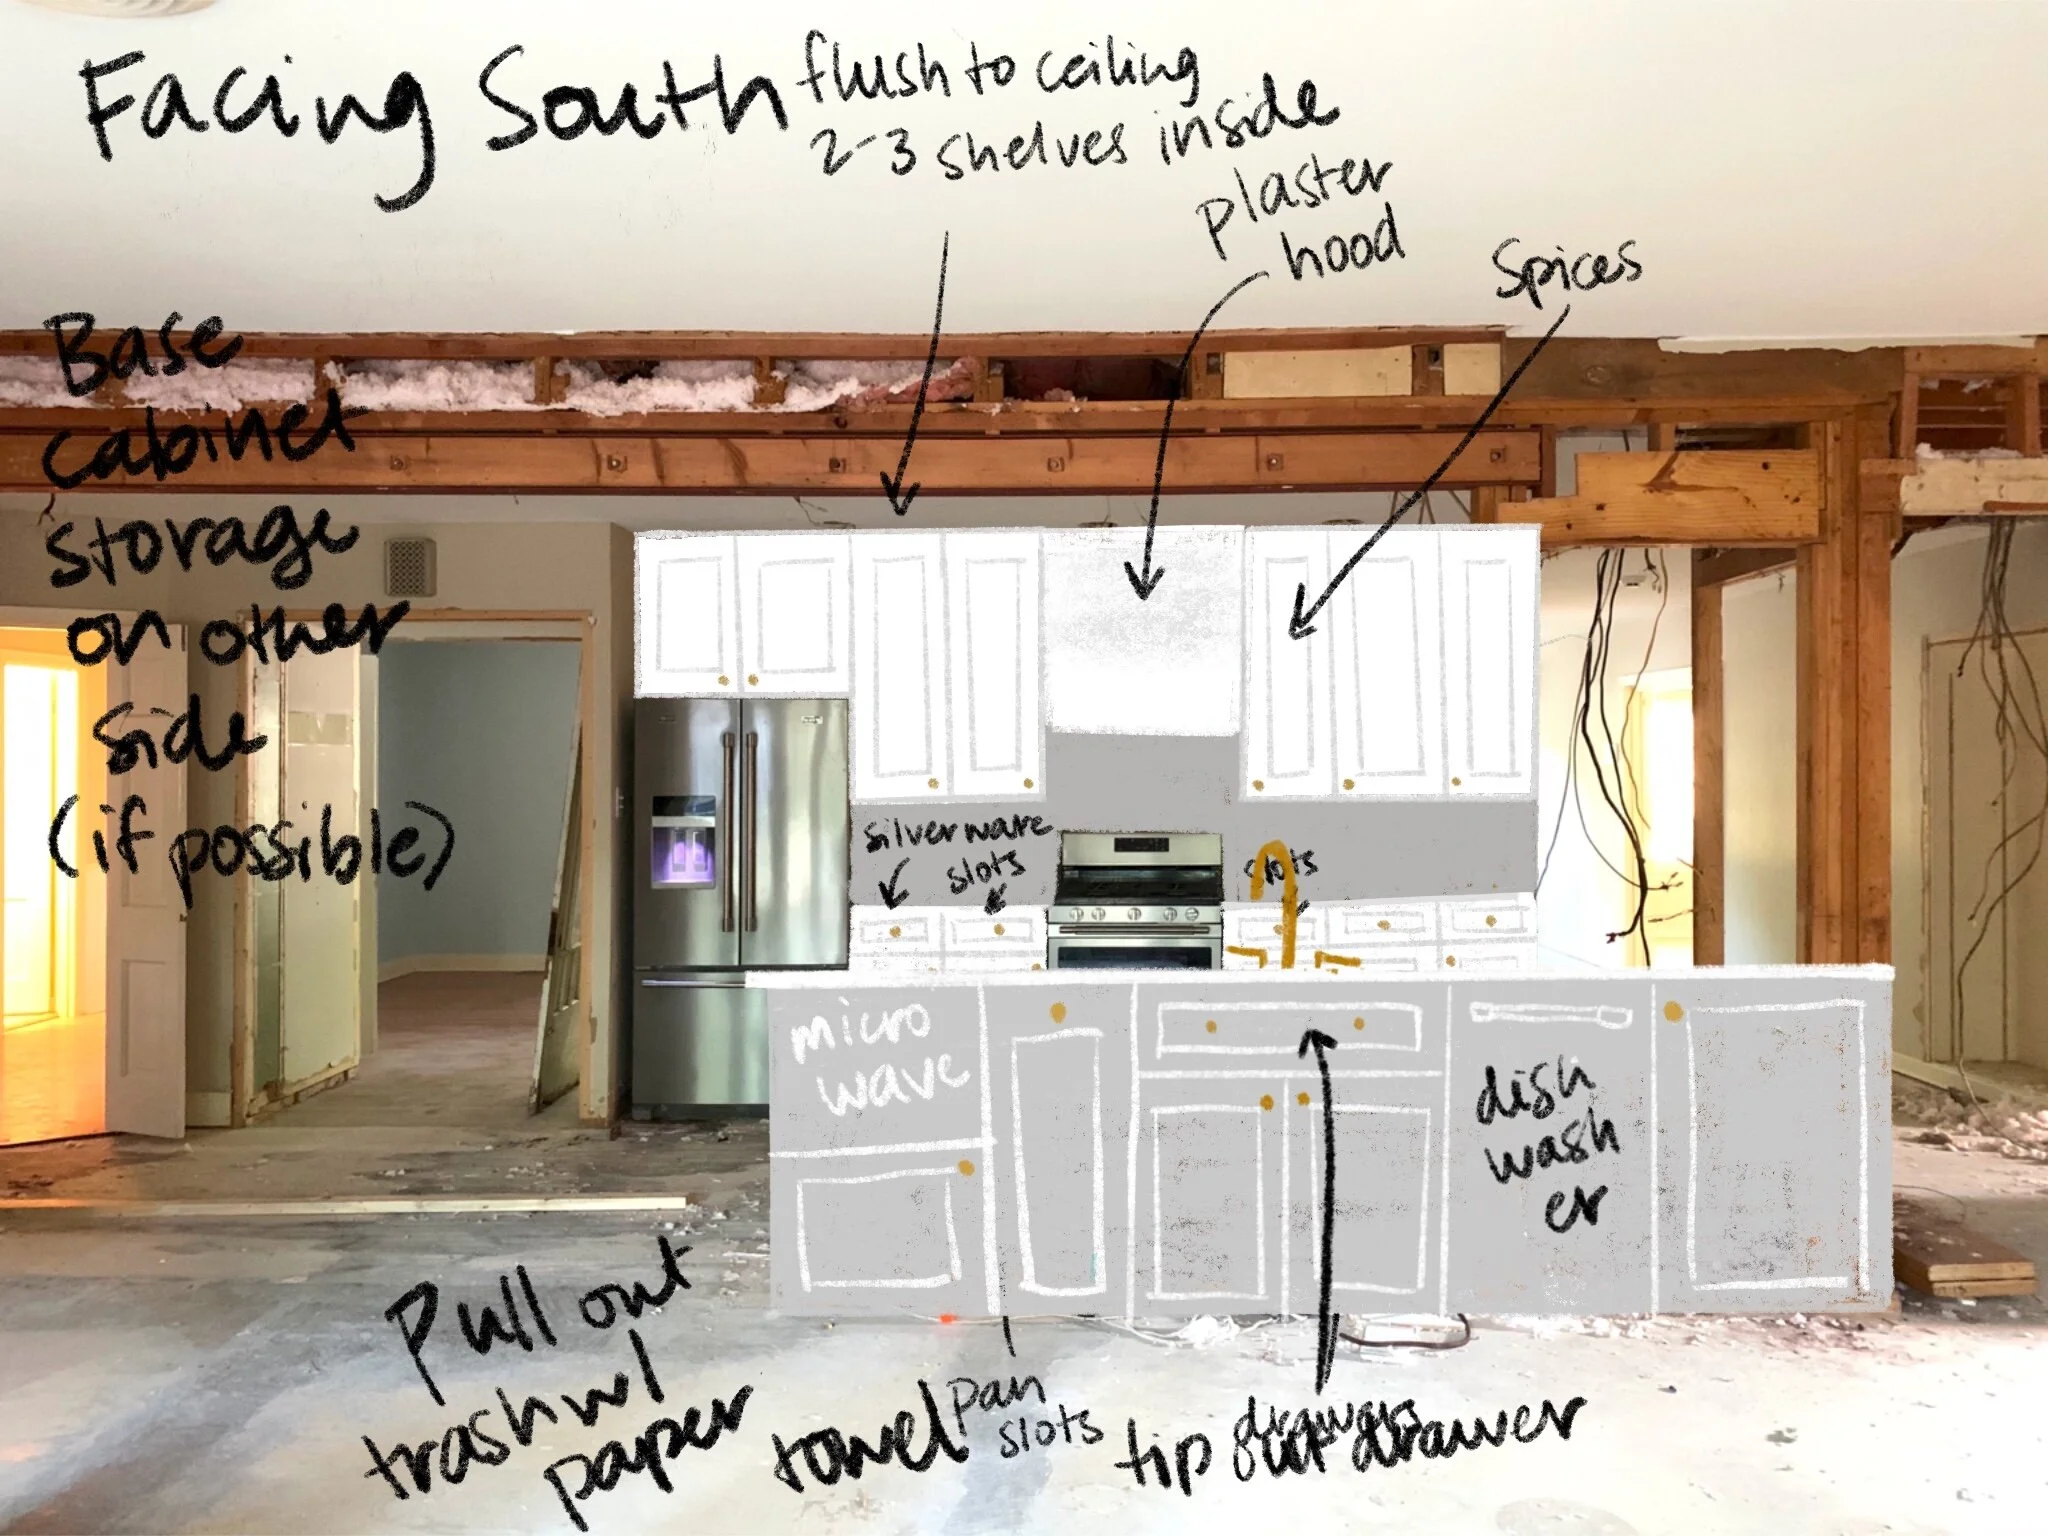
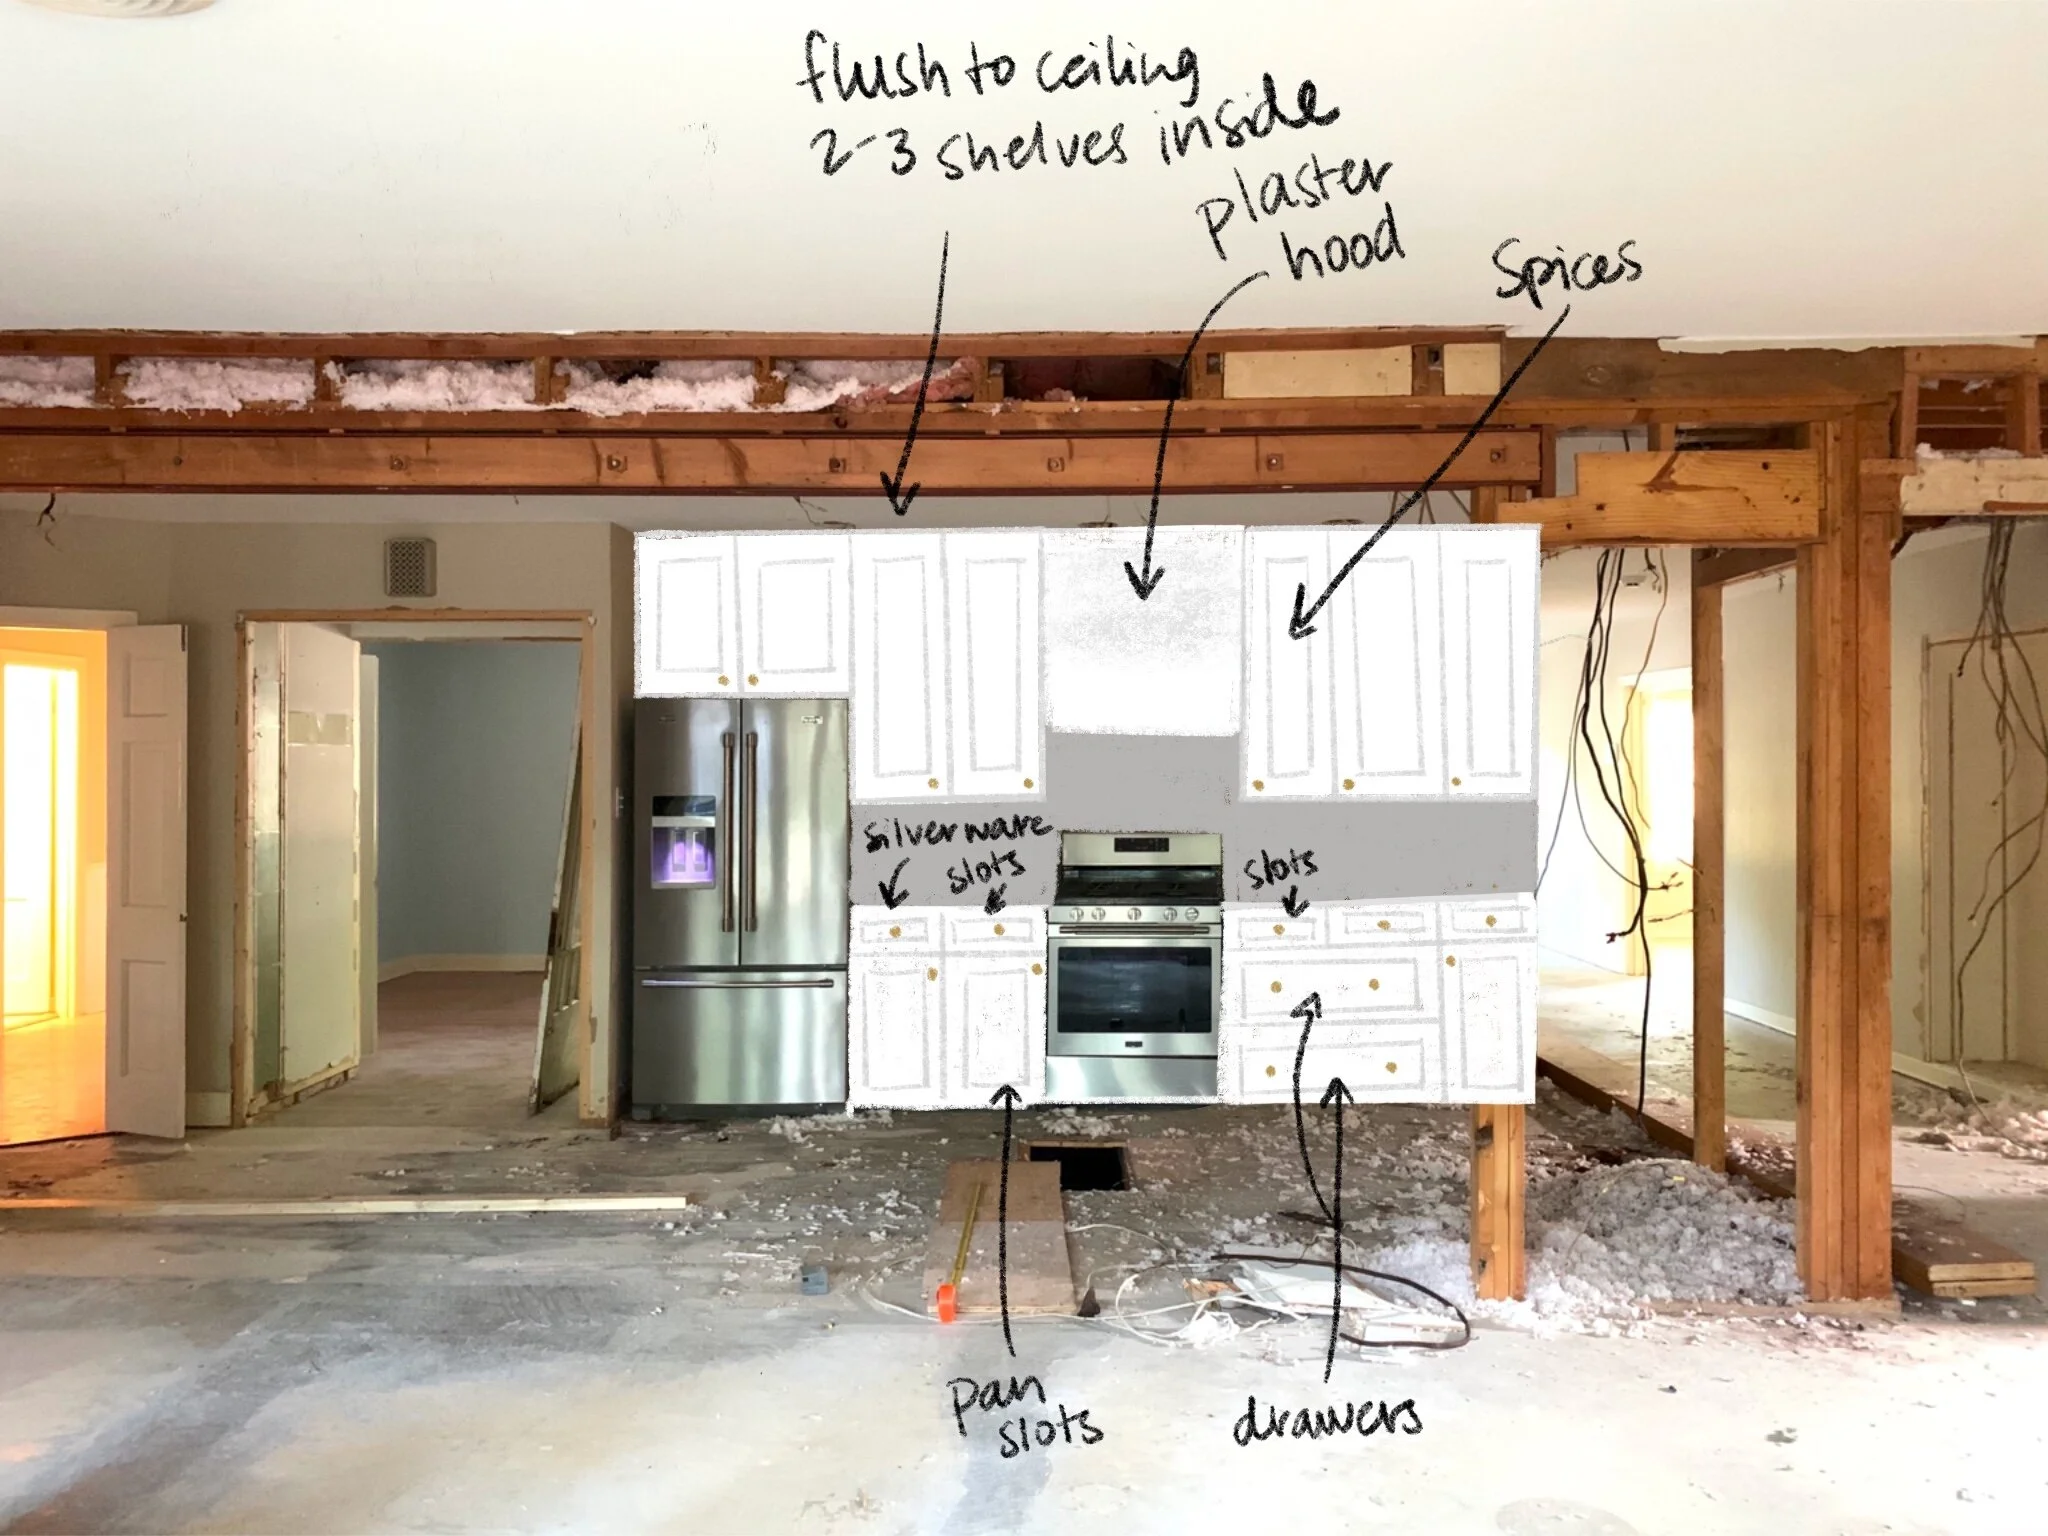
See those white sliding doors to the left of the fridge? That was the “pantry”. It was nice and wide, but only about 6 inches deep. I’m not kidding- 6 INCHES deep. Basically pointless.

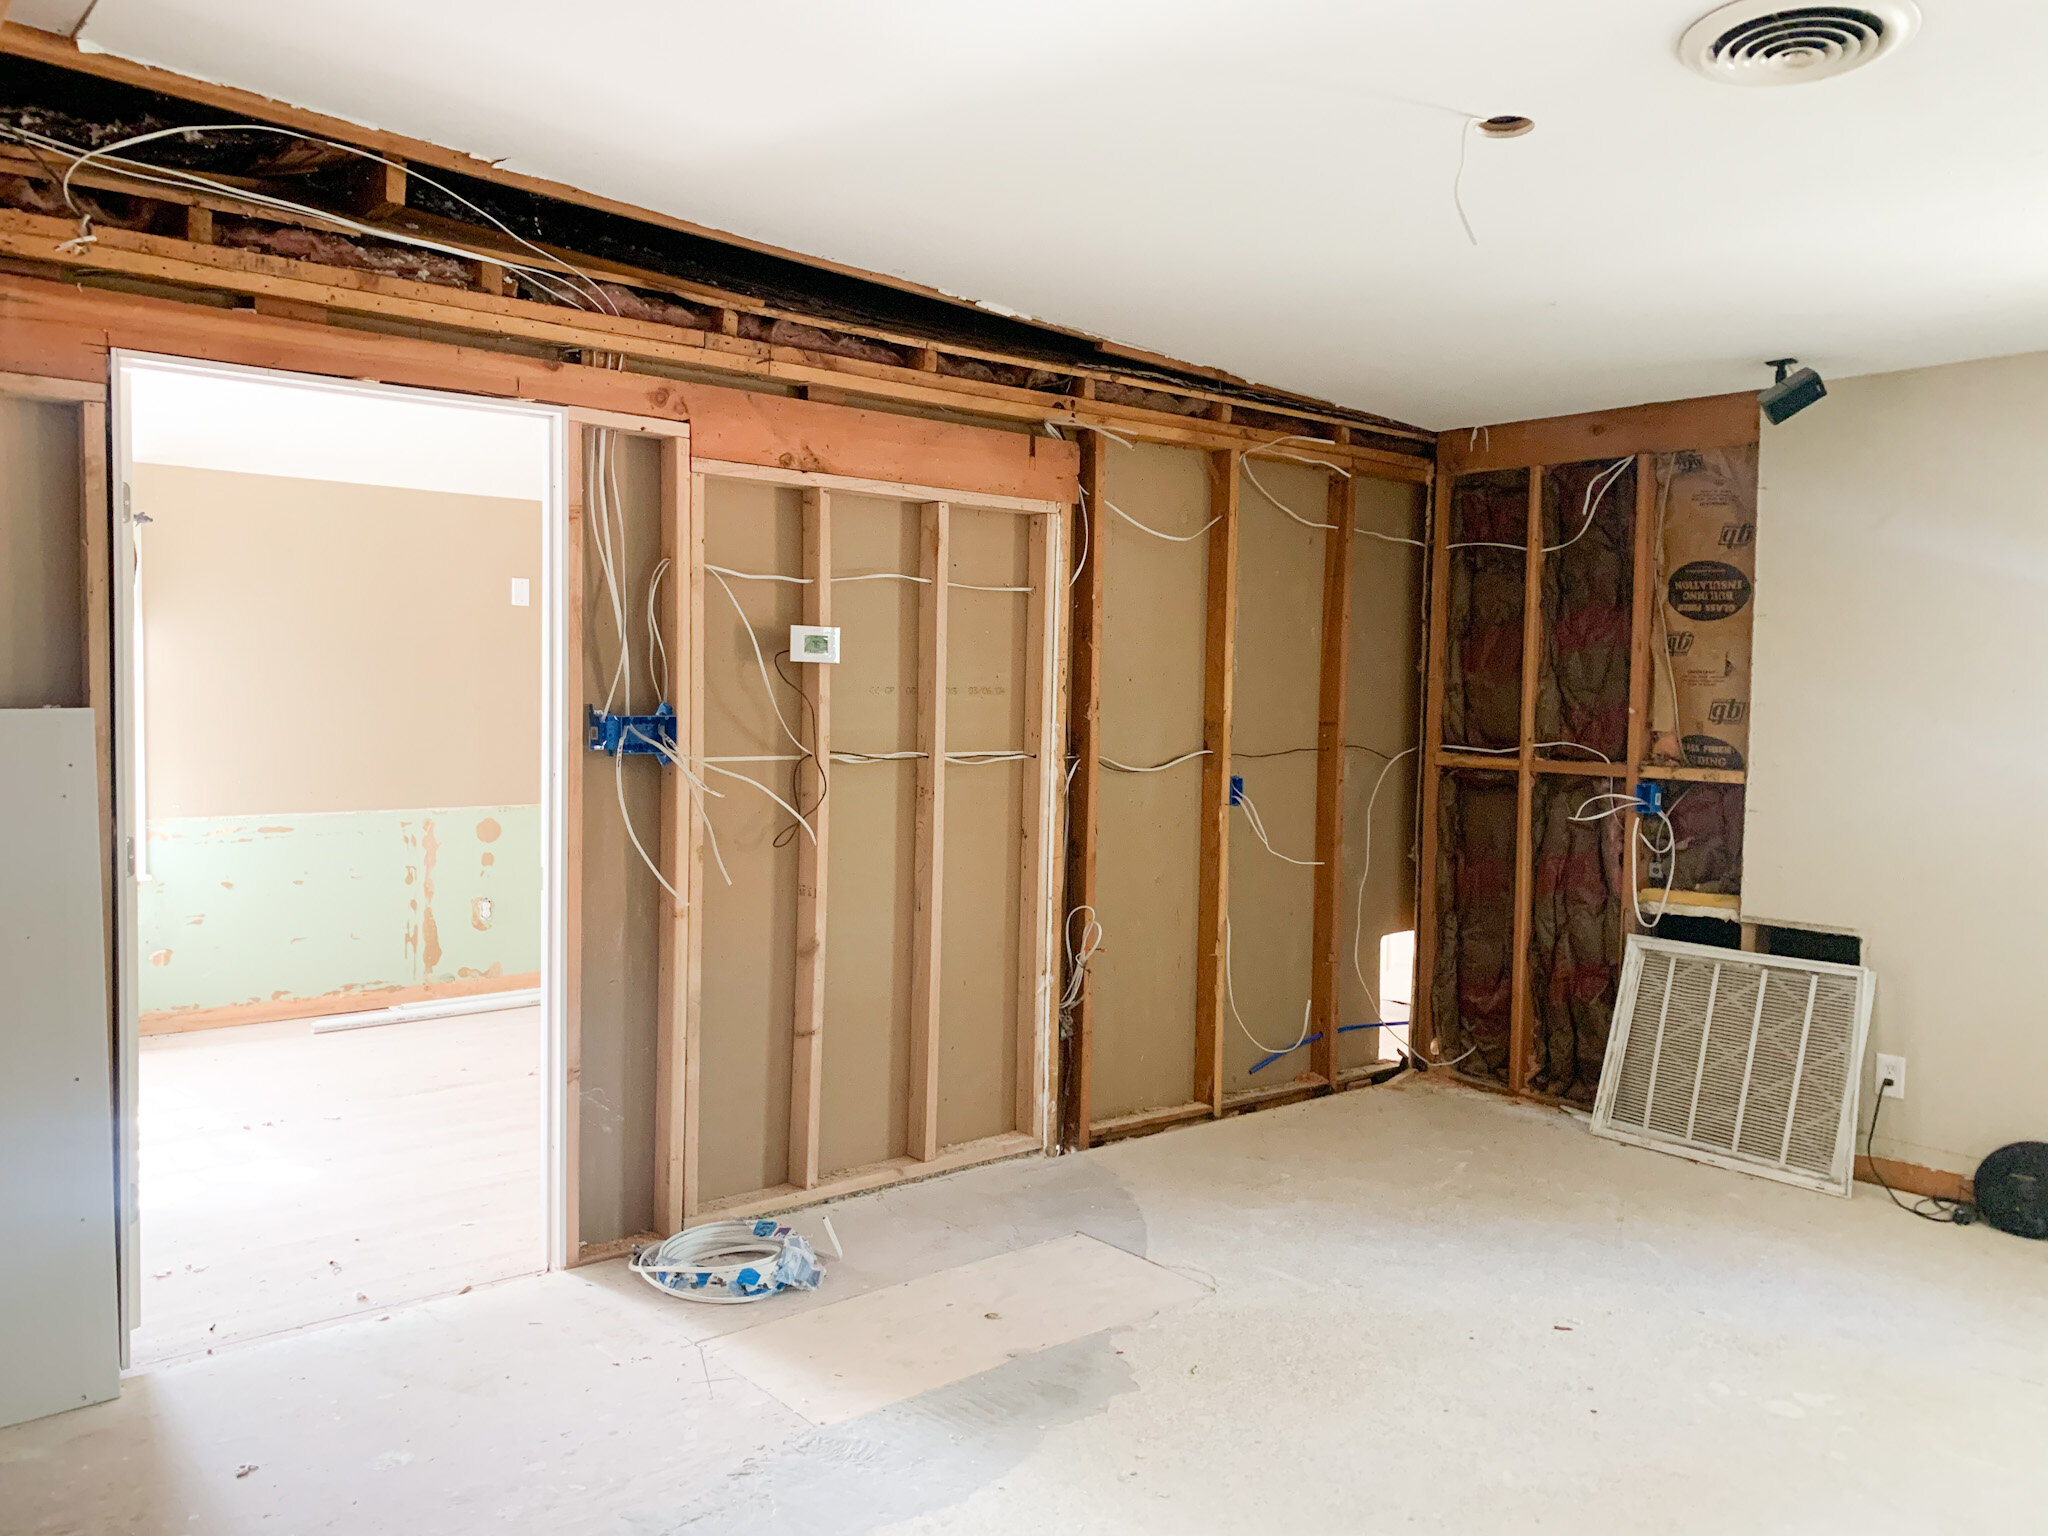
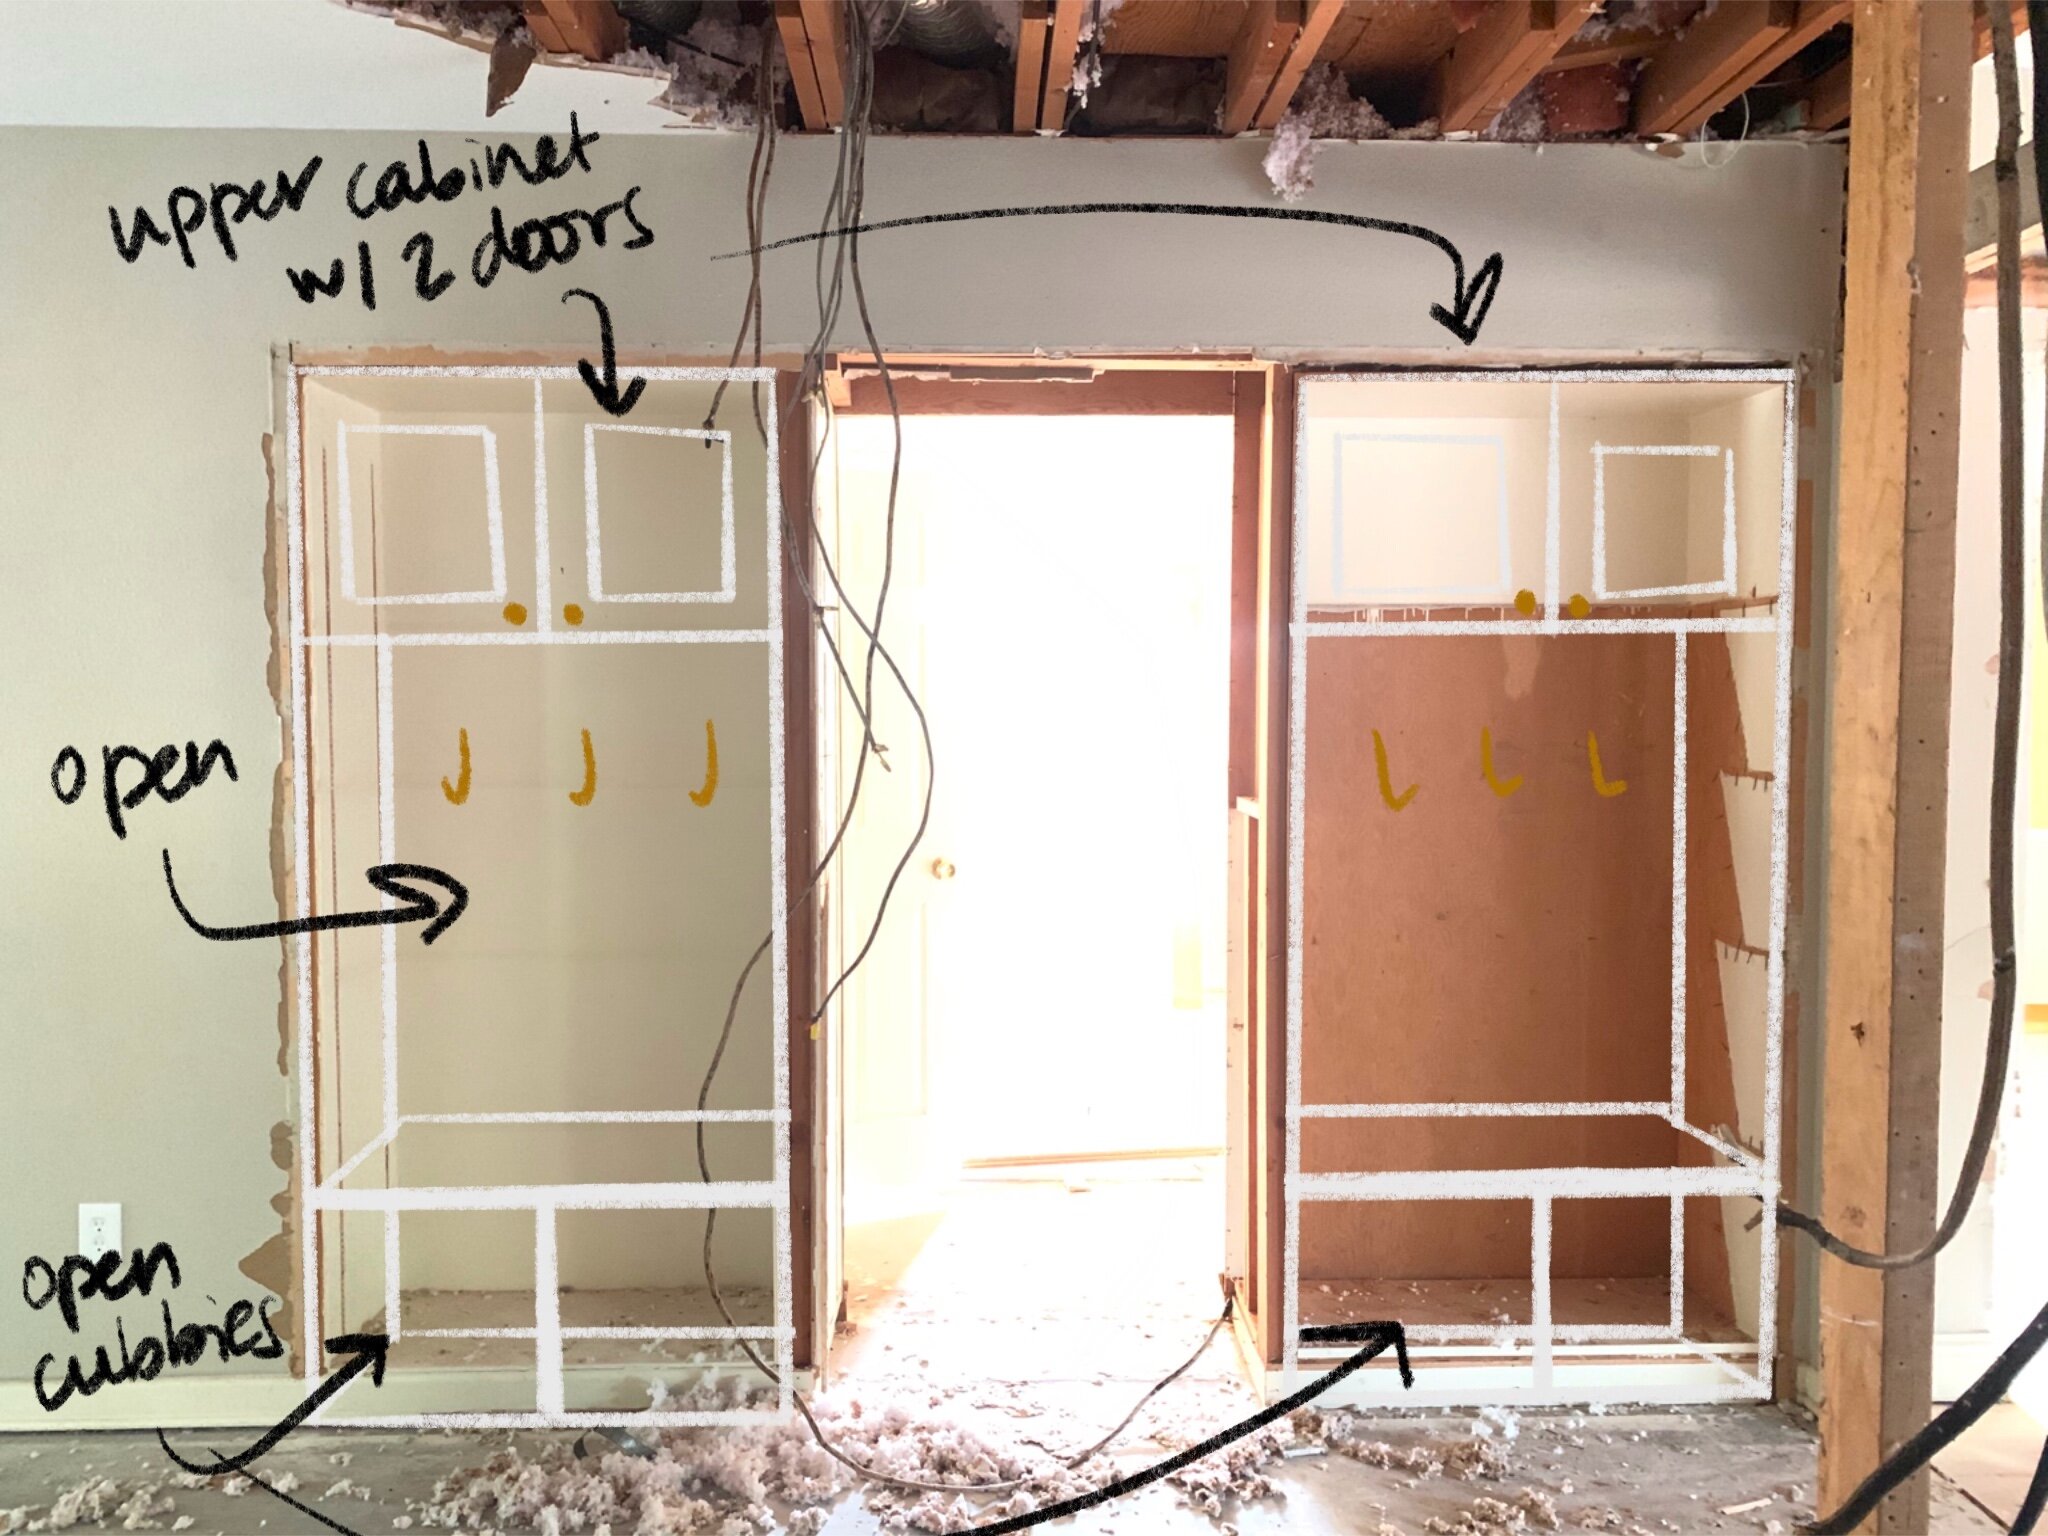
Thankfully, the room directly behind the pantry had a closet that wasn’t super necessary- so I chose to bust through the wall and create a larger pantry. I also wanted to add a bit of character with the new pantry door, so I found a great antique door at Jux Ta Posh (one of my favorite shops here in Lubbock!) and stripped it so you could see the original wood. It turned out to be quite a project and my Dad and Shawn even had to jump in- but I’m so pleased with the results!

E7436BBE-9DE0-45A1-BEBF-A51D8BEF70F6.jpg

Here’s how it turned out- quite different, right? I don’t typically keep the light on when the door’s closed. :)

DSC_2469.jpg

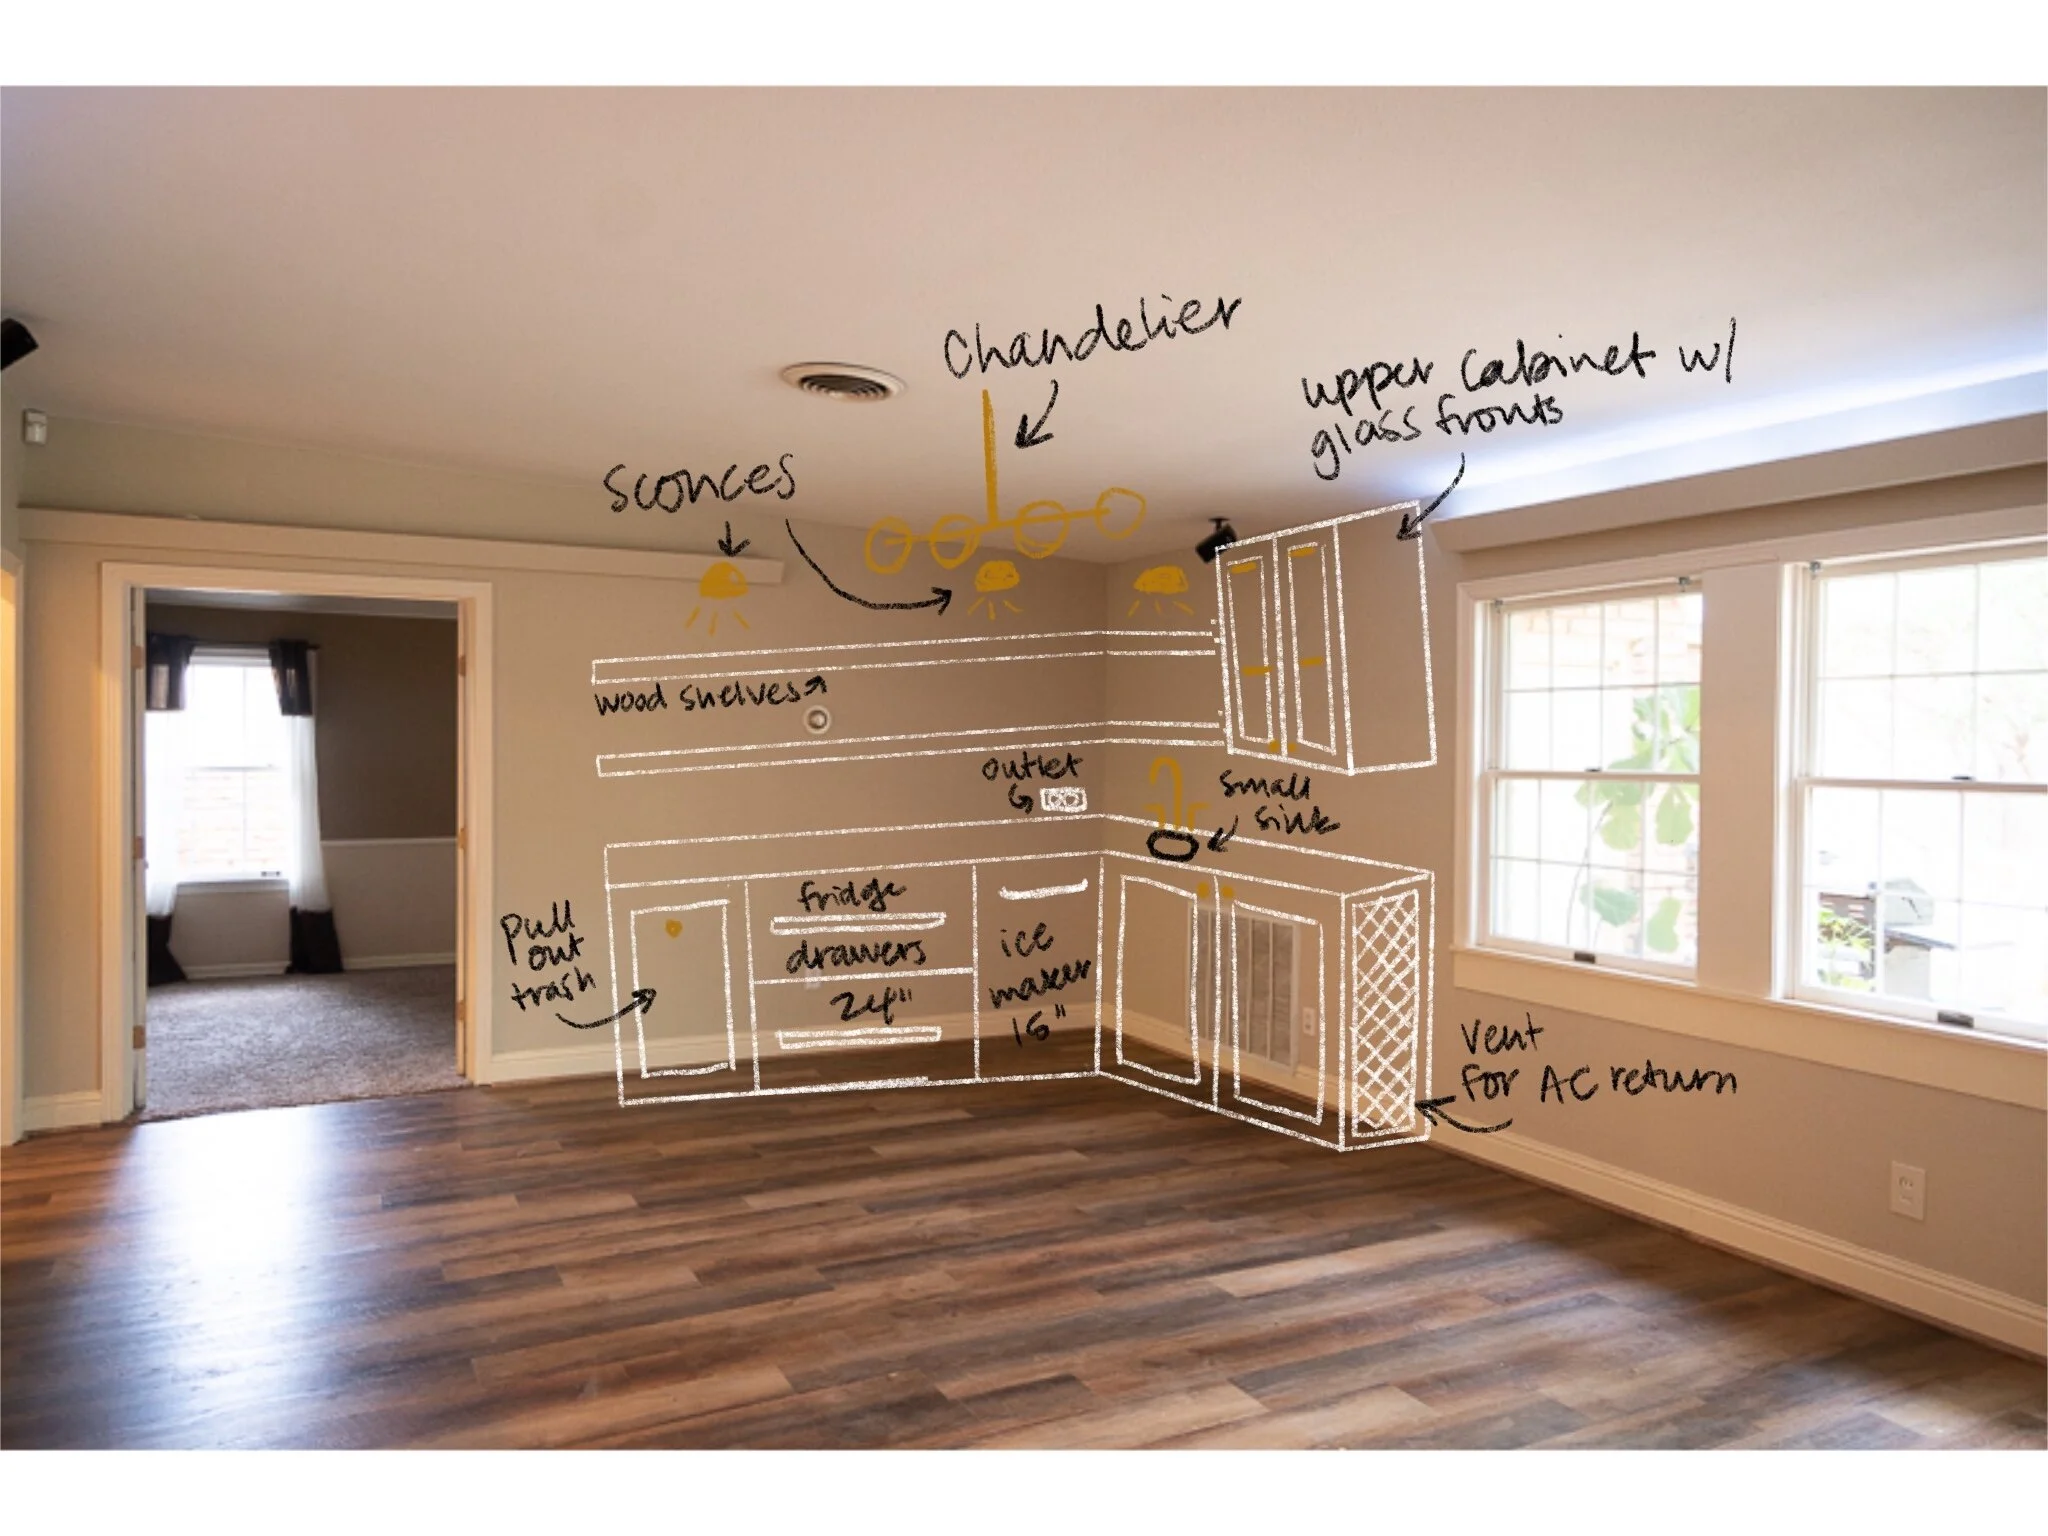
Anyway, because of all the new space, it was high time to get ORGANIZED. I was really thankful to have had time to think about how I wanted to place everything- what needed to be accessible for my kids, things I grab for cooking frequently, pain points from our last home’s pantry.

I ended up finding quite a few great products for the job- they have been total game-changers in keeping the area looking tidy- especially now that it’s somewhat visible.

DSC_2403.jpg

Here are a few things that were really helpful with organization:

Gold Wire Baskets - used here for baking supplies

Clear Plastic Canisters - for rice, beans, flour, sugar, etc.

Clear Tall-Sided Lazy Susans - I splurged for these tall-sided ones and am SO glad I did. Things don’t fall over/out of these and they are sturdy and spin well even with heavy glass bottles in them

Large Stacking Bins - for chips, cereal, anything large and bagged. I have LOVED these because they keep everything from falling over or on the floor. (These are out of stock at the time of this post 😫which breaks my heart because they are one of my favorite things! But, I’m linking some similar ones here.)

DSC_2409.jpg

I also wanted to make the most of the space at the bottom of the pantry- and was happy to find a couple of shelving units that fit perfectly, along with a stool that easily folds and tucks away right inside the door.

White Shelves - these are actually shoe racks but work perfectly for the bottom of the pantry!

Foldable Step Stool - I will probably be buying more of these, haha- we all use this constantly.


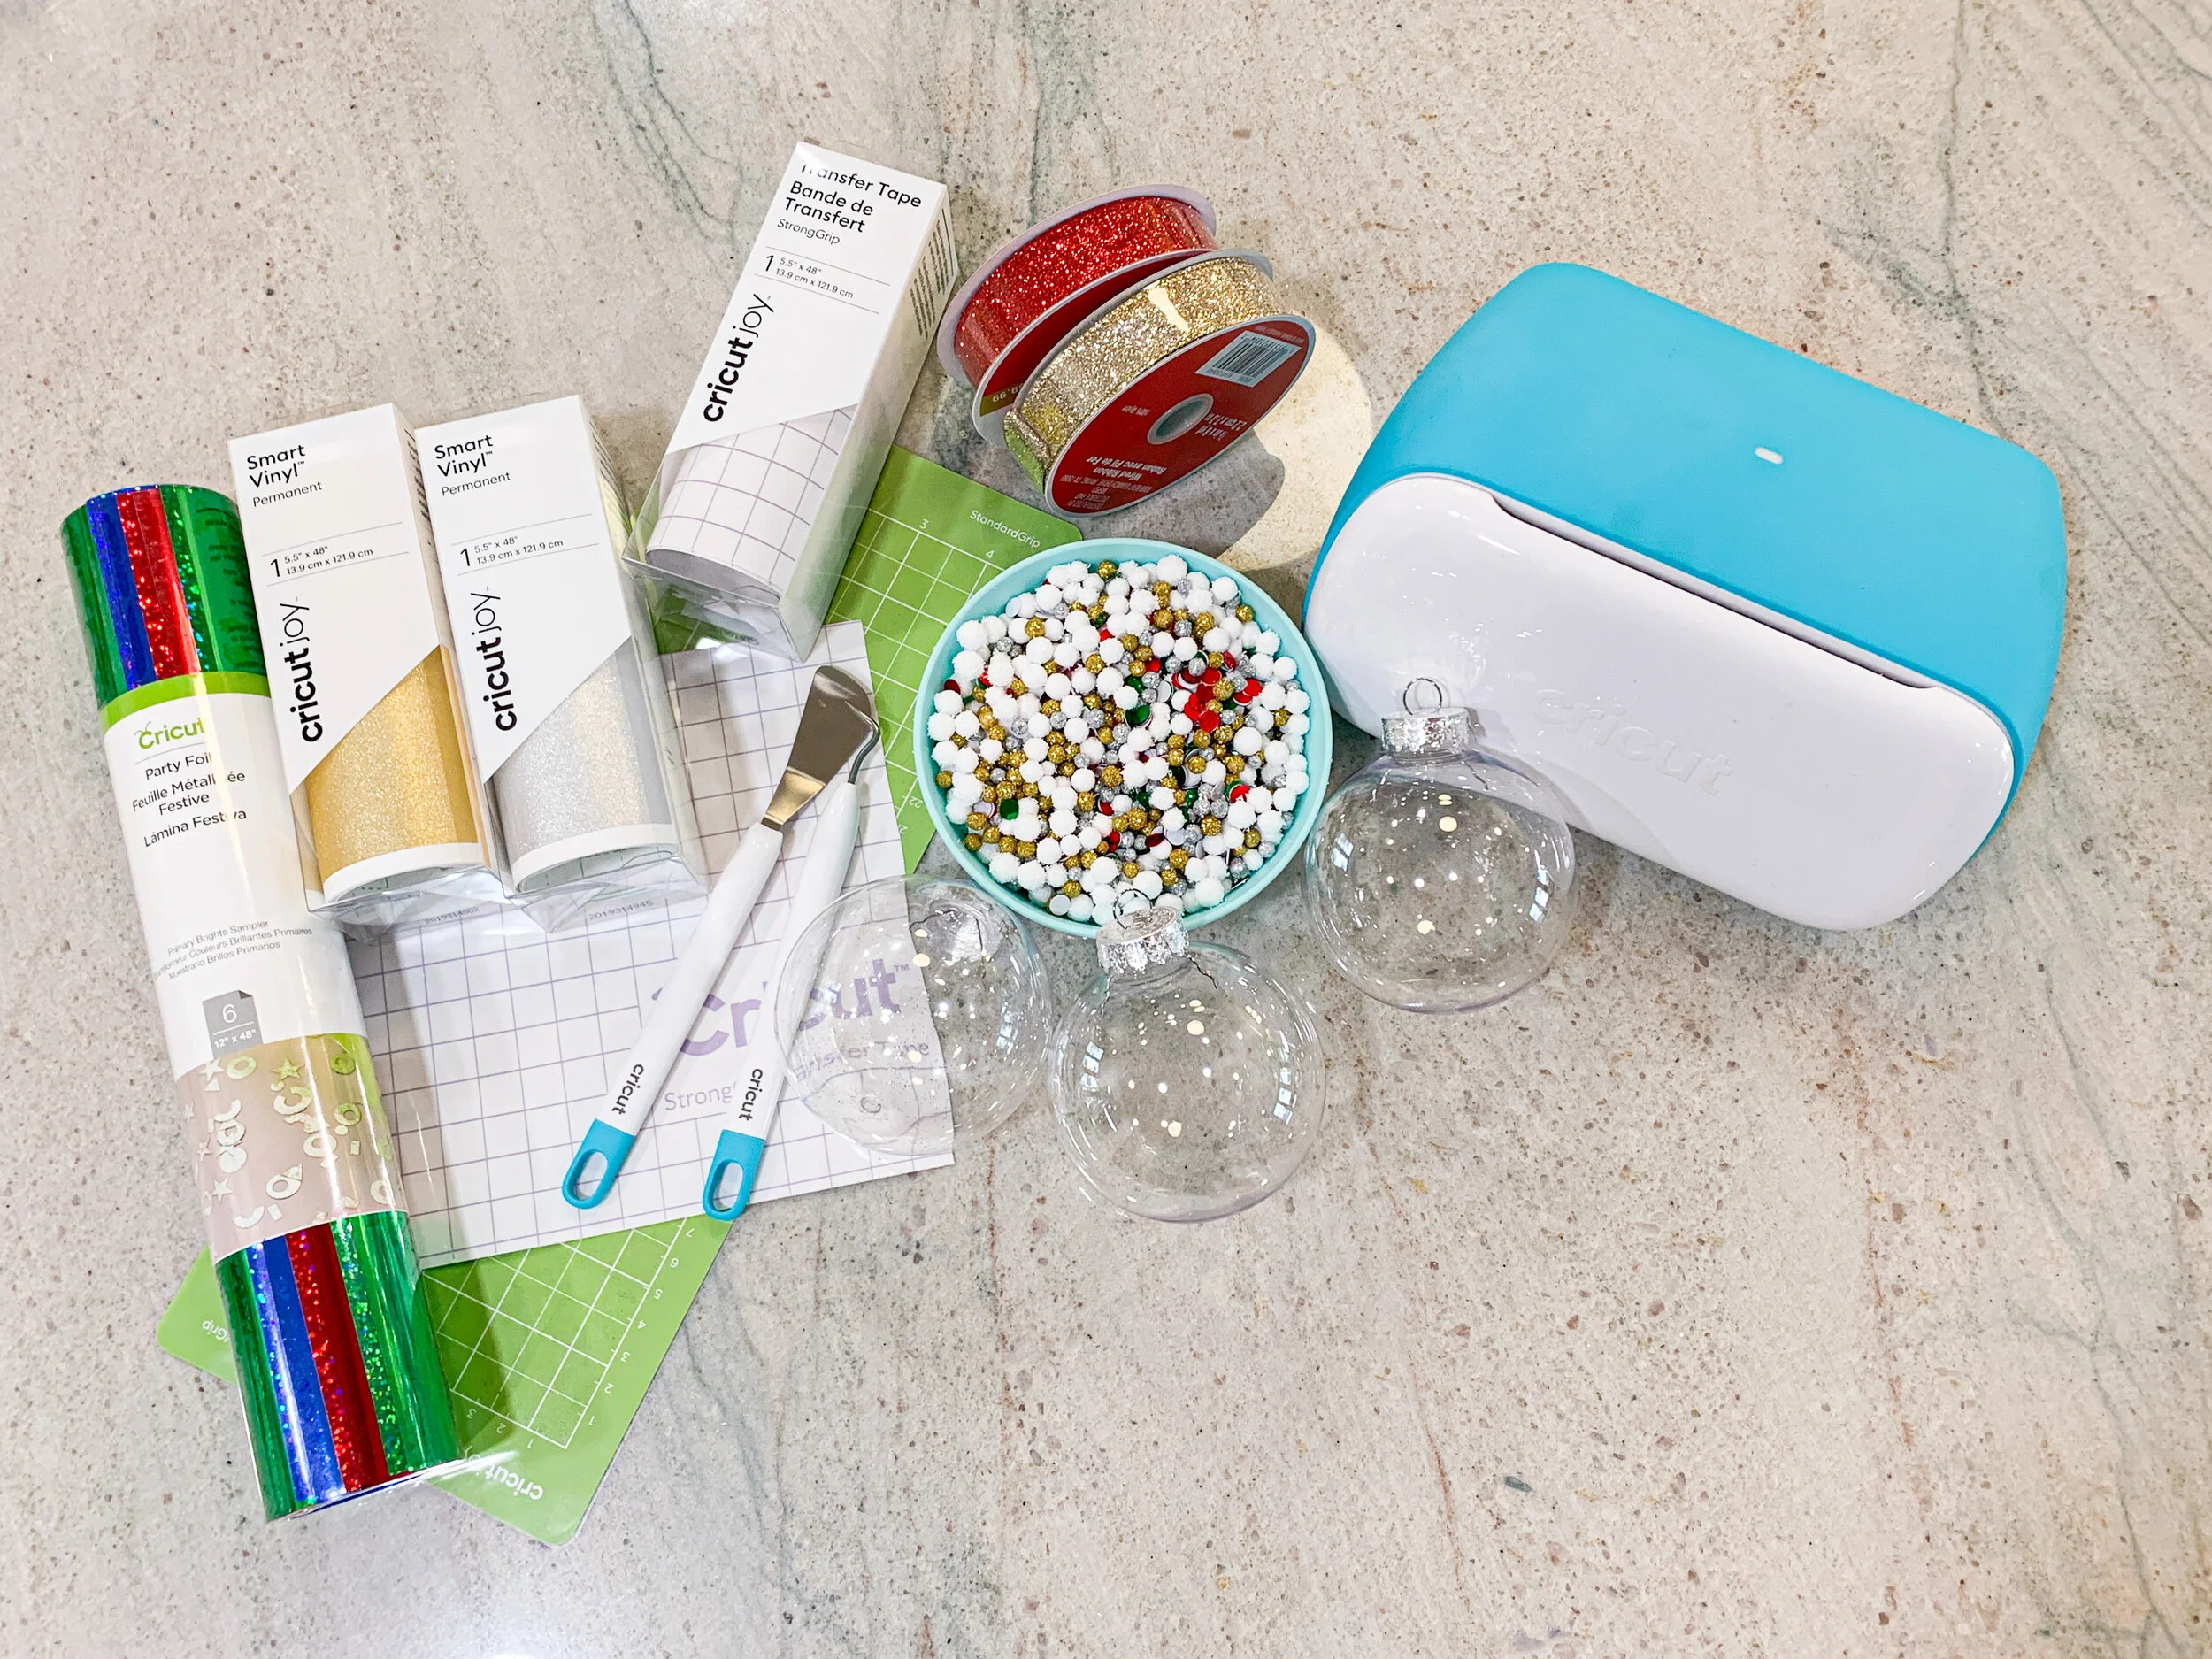
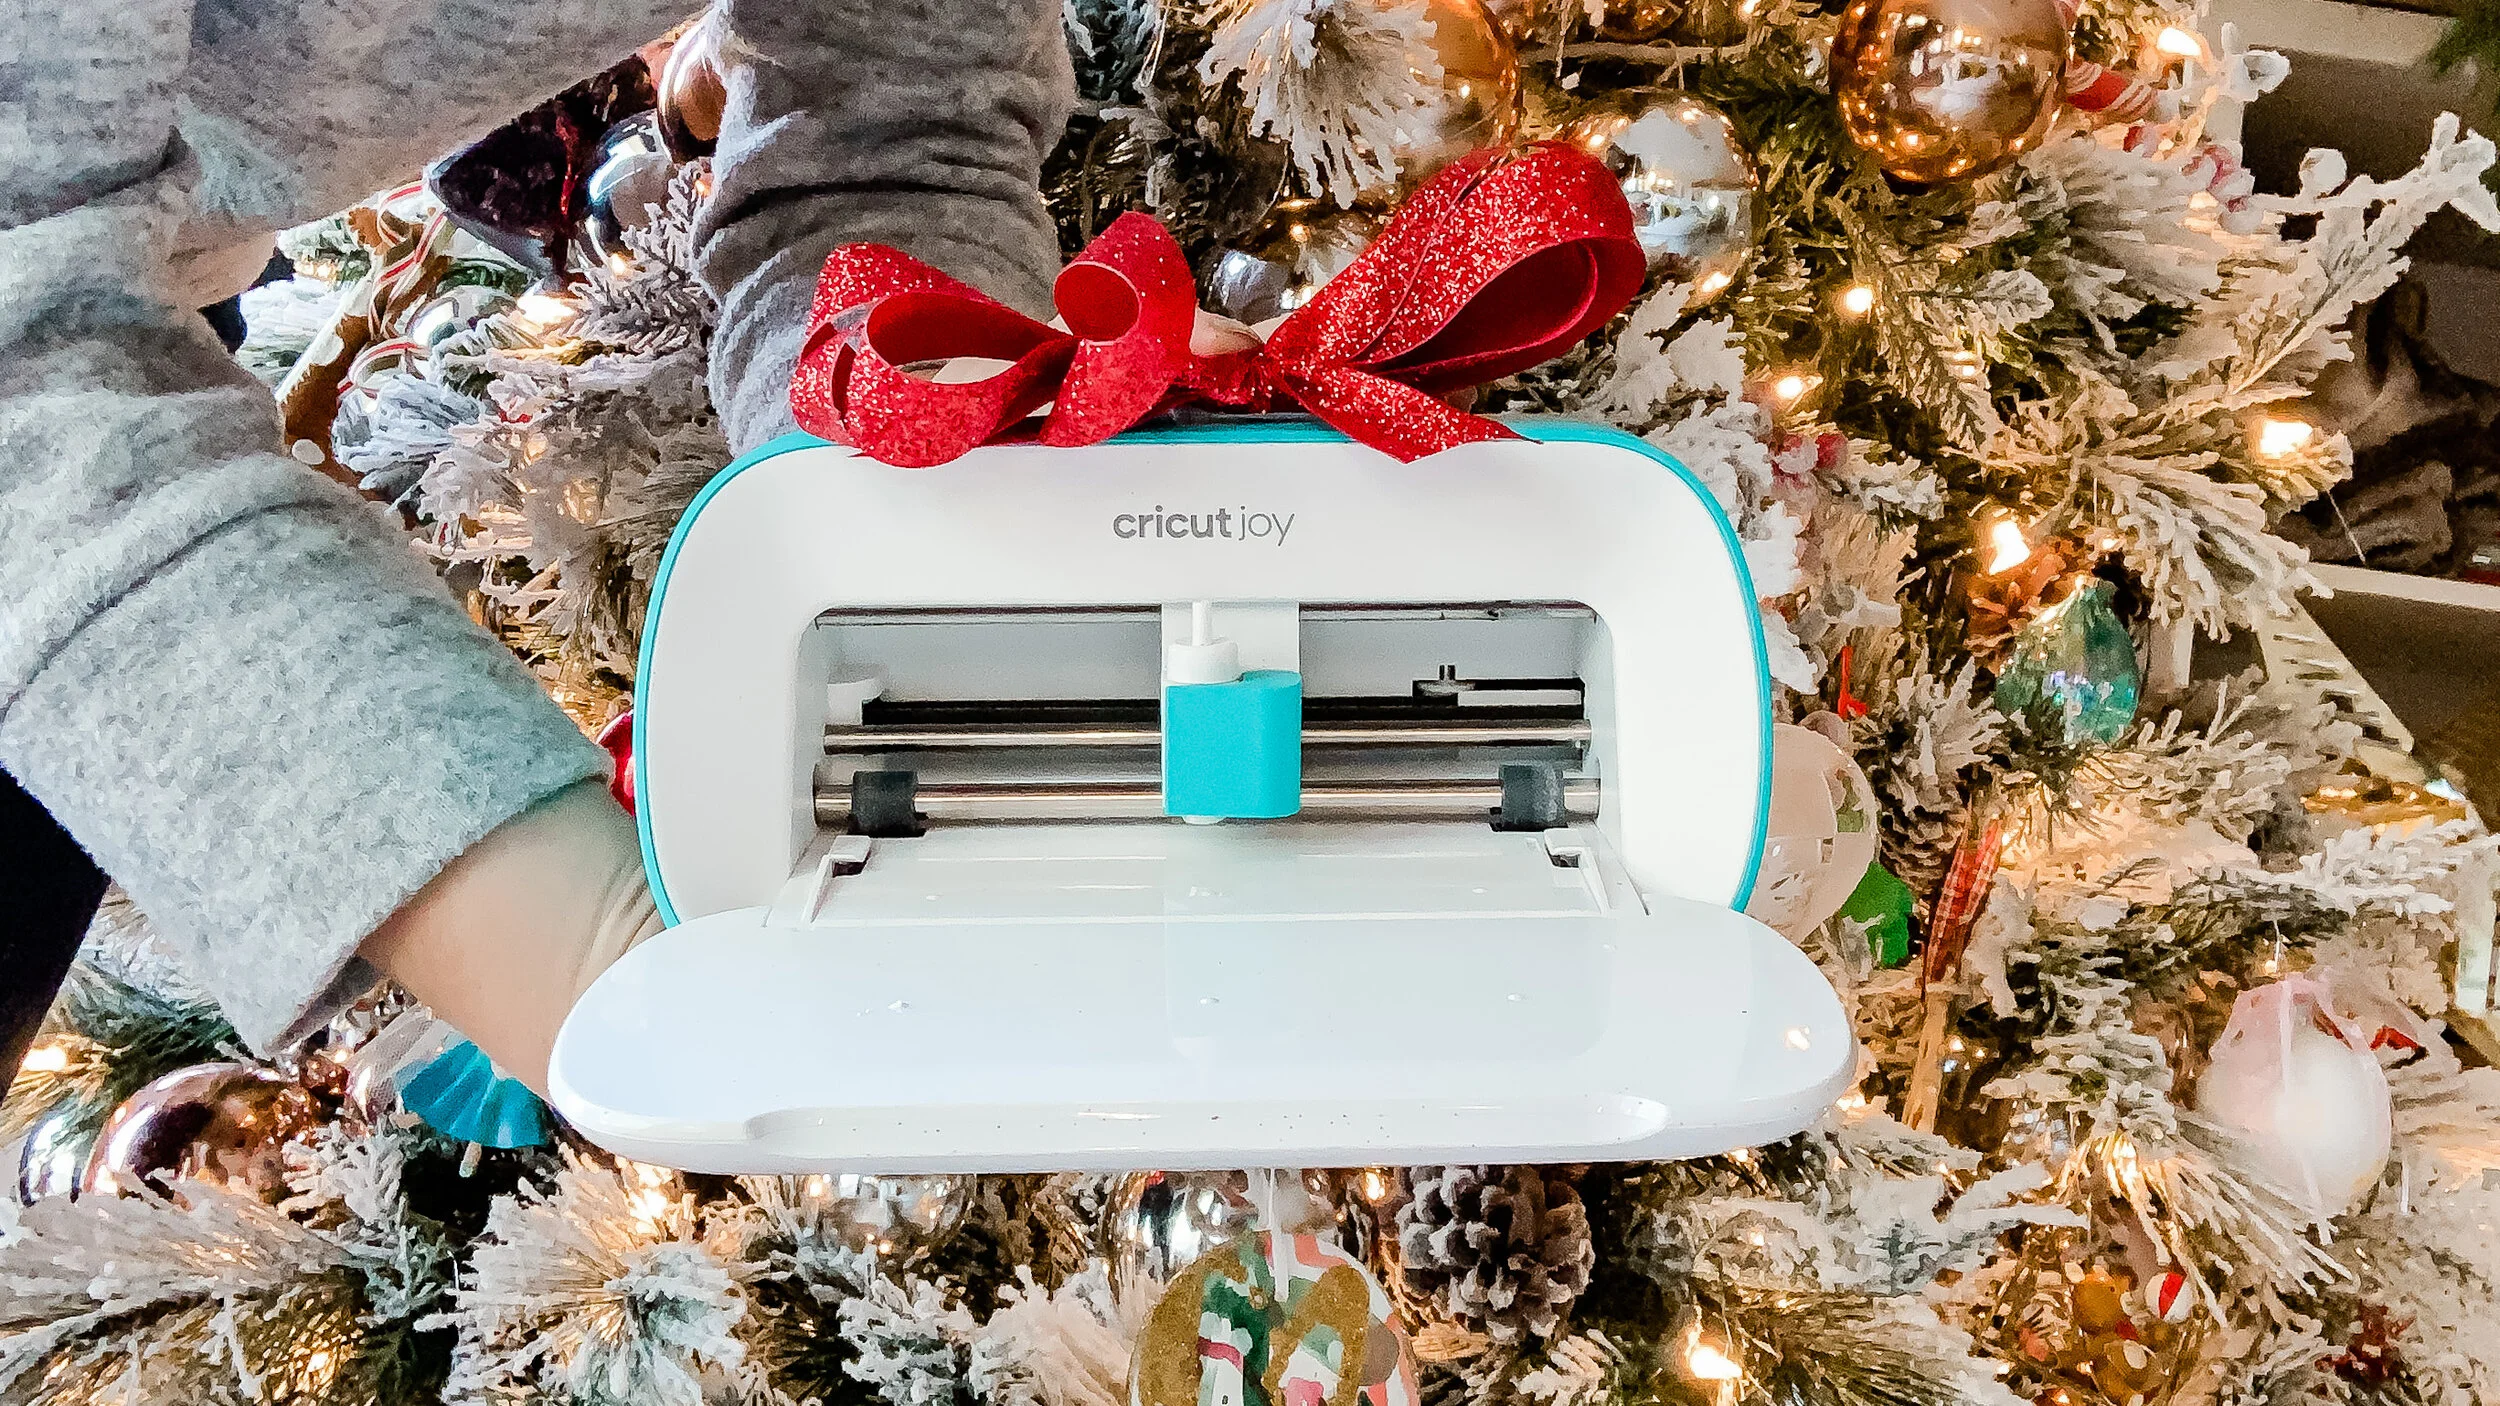
To create the labels for everything, I used my Cricut Joy and the mobile app. It was super simple and I filmed a short tutorial on how to do it below. One of my favorite things about the Joy is that it is so portable- so I literally set it up in my kitchen and cut everything straight from the app on my phone.

If you’ve never used the Cricut Mobile App before, don’t be intimidated- it is super intuitive and basically just like Design Space on the computer. Feel free to check out my tutorial below- but here are the basic steps:

Tools needed for this project:

Cricut Joy

Cricut Joy Design Space mobile app (free)

Weeder and Scraper

Joy Smart Vinyl - Permanent in the 2 colors of your choice

Cricut Transfer Tape

Scissors

IMG_9517.jpg
DSC_2397.jpg
  1. Measure the spaces where you’ll put your labels. My canisters had the smallest available label space at about 1x3 inches, so I decided to make all the labels that size.

  2. Create the black boxes using the shape tool. I made mine 1x3 inches, duplicated them, and cut them out on the Joy.

  3. Type out your words in Design Space and ensure they are all sized to fit within the boxes you’ve cut. I used Market Street Fonts- Eloise in all caps for this project. Cut them out on the Joy.

  4. Weed your words and use Cricut Transfer tape to place the words on the boxes. Labels are done!

  5. Stick your labels on your stuff. Done!

CricutLabelPantryPinterest1.png

This post contains affiliate links, on which I will receive a small commission should you purchase anything/sign up/subscribe etc. I would never share something I didn’t actually like or want to share with you, so I wanted to let you know. Sharing affiliate links affords me a few more lattes and it’s always my aim to add value to your life with the brands and products I share. Thanks for supporting me!

Terracotta Floor Vase DIY (on the cheap!)

CRAFTS, DIY, AnglinAbodelissa-anglinComment

Well friends, we have officially finished the renovation process of our home- I really had great intentions to share more of the in-between process, but now I think it’s best I go room-by-room so that I can show you the full transformation in each space.

That being said, as I work on getting everything styled/decorated, I have been working on some fun little side projects, like this one!

terracottafloorvase.png

If you’ve been on the internet for half a second lately, you will have seen the HUGE pampas grass trend that’s happening right now (here you go just in case you don’t believe me)- which is super handy for those of us living in West Texas, because it grows really well here. In fact, my parents happen to have some in their backyard.

So, I asked my mom to bring me some to use on our fireplace mantel. Little did I know that they would literally be 5 feet tall and waaaayyyyy too big to put in the tiny vase on our mantel I’d planned. So I decided to just put them in a floor vase on the ground. Problem was- I had no floor vase, and barely any budget to go out and buy one.

That’s when I found myself hanging out in the air ventilation section of Lowe’s looking like a crazy person to the many contractors who came and went while I pondered. But guess what, ya’ll? I DID IT. I made a vase, and it only cost me $15.

This project was definitely more of an experiment than an actual “project”. I had seen the terracotta paint trend on Tiktok and thought this would be a fun opportunity to try it out. Warning: THIS IS A MESSY, IMPERFECT PROJECT. If you are a perfectionist, maybe just save up your dollars and buy yourself a vase. But if not, read below to see how it turned out!

Here’s a quick little video if you want a sneak peek of the process:


What you’ll need:

  • Galvanized Steel Round Duct Pipe found in the HVAC section at the home improvement store

    • I used a 6”x24” one ($7), but you could use any size- they have larger ones

  • Galvanized Steel Round End Cap (also in the HVAC section)

    • You will want to be sure you get the same width as your pipe- in this case 6” wide

    • This cost around $6

  • Plaster of Paris (found in the paint section, but I already had some at home)

  • Medium to coarse grit sandpaper- I used 60 grit I had at home

  • Vinegar

  • Water

  • Duct Tape

  • Wide Paintbrush

  • Acrylic paint (I used brown, red, black and yellow to create a terracotta color)

  • Polycrylic Satin Finish (not necessary but recommended)

IMG_8918.jpg

Step 1: Build the vase

This is pretty self-explanatory: the pipe has a snap-lock design that literally just pops into place. Might want to wear some work gloves while doing this, though- those edges can be sharp!

Once the tube is made, insert the end cap. It should fit perfectly on the plain end of the tube (not the side with the waves).

Step 2: Prep for paint

I used the duct tape to cover the top end of the vase- so that it had a rounder edge and I wouldn’t be cutting myself while working with it. I used several pieces and just folded it hot dog style over the lip.

Next, you’ll want to wipe the outer surface with vinegar. Just wipe and let it set. And then sand your little heart out. The galvanized steel has a chemical layer on it that keeps it from rusting, and that needs to come off in order for the paint to adhere. The vinegar helps it break down, and the sandpaper takes it off.

Sand everything for as long as you can. The rougher the surface, the better your paint will adhere- and even sand the duct tape a little. It will be fine, I promise.

Step 3: Paint

So there are many different recipes for terracotta-style paint- but I chose to use Plaster of Paris because 1. I already had some at the house and 2. I like working with it. It’s water soluble and pretty forgiving.

To mix your paint, you’ll dump a cup or so of the plaster of paris into a bowl, add your paint (I did generous squirts of brown, a little red, and a little yellow), and then around a 1/2 c of water. Use a popsicle stick (or some other hard tool) to mix. You want your mixture to be spreadable, but hold it’s shape- I would say a thick milkshake texture. If it’s too thick, add a bit of water. If it’s too thin, add a bit of plaster.

For more of a visual on mixing the paint, check out my short video above.

1st coat finished and dry! As you can see, the plaster mixture is much darker when wet.

1st coat finished and dry! As you can see, the plaster mixture is much darker when wet.

Also remember that because the plaster is white it will naturally make your mixture lighter. It will also dry significantly lighter than it is when wet. I did a few test colors on the protective cardboard I was working on to check color before I actually started painting the vase. To do this, just wipe a bit of the paint/plaster mixture on a surface and use a blow dryer to dry it. It should lighten considerably and give you a realistic color representation.

You will need to work relatively quickly, because your plaster will harden and create chunks in your mixture. If you’re into the texture, go with it. If you’re not— don’t say I didn’t warn you. :)

Turn the vase upside down and start painting. Your first layer will be thin and you’ll likely be able to see the metal through it in places. Be sure the bottom is completely dry before flipping it over to paint the top lip. I also painted the top 3-4 inches of the inside. The plaster is very fragile as it dries and so it will chip off if you’re not super careful when you’re moving the vase around.

Here you can see the texture of the plaster and the inside of the vase with only 1 coat.

Here you can see the texture of the plaster and the inside of the vase with only 1 coat.

Once you have 1 coat, cover your plaster mixture (if you don’t, it will dry and chunks will form!) until you are ready for the 2nd coat.

Repeat the process with 2 more coats. The texture should build considerably, and the pattern/seams in the metal should disappear under the plaster. If you feel the vase is getting too texture-y, don’t worry- once it’s dry, you can lightly sand it with sandpaper and it will smooth out.

I paid special attention to the tip rim of the vase once I was finishing up- making sure there was enough thickness there with the plaster.

Step 4: Paint Details (Optional)

Once the plaster was completely dry, I decided to add some detail to make it look more pottery-ish. To be honest, I’m still not sure if I like it, but I’m going to let it hang out by my fireplace for a while to see if it grows on me.

To paint the detail, I just thinned out some white acrylic paint and used a round brush. I wanted the detail to be a little transparent, and this did the trick. If your paint is too thin and it drips, it’s pretty easy to wipe off with a damp paper towel.

The finished product!

The finished product!

Step 5: Topcoat

This step could also be optional if you are super in love with the matte look and don’t want to change it in any way. However, I will say that the Polycrylic Satin is quite matte when dry and will actually make the vase more sturdy and strengthen the plaster/paint mix- so I highly suggest it.


If you give this project a shot, be sure to share your results with me by tagging me @lissaanglin on social! I’d love to see if I could find some type of cardboard tube to also try with this plaster-paint treatment.

Come say hi on Instagram!

diy holiday gifts- foil name confetti ornaments with cricut joy

CRAFTSlissa-anglinComment

Are you team hodge-podge ornaments or team store-bought matching ornaments? Our tree is made up almost entirely of random, homemade ornaments going back to my childhood and I love that I get to relive those memories each year as we hang them on the tree. I’ve made my kids ornaments almost every year in hopes that one day they will have the same memories.

IMG_7545.jpg

I’m honored to partner with Cricut this year to make some custom ornaments for my kiddos! When I first saw Cricut’s Party Foil in all it’s shiny, glittery goodness, I knew I wanted to figure out a fun, new way to use it.

This is a quick, beginner-level project that will hopefully teach you a few tricks in Cricut Design Space.


This post is made in partnership with Cricut, a company I love and rave about on the regular! It also contains affiliate links to the products I mention here. These links help me keep creating fun things in this space, so when you click on one, it’s like a virtual high five- thank you!


IMG_7536.JPG


Supplies needed:

(These are affiliate links- when you use them to purchase, I receive a small commission, which helps me create more content for you!)

Cricut Joy

Cricut Joy Standard Grip Mat

Cricut Weeding Tools

Cricut Party Foil

Cricut Joy Smart Vinyl Shimmer (I used gold and silver)

Cricut Transfer Paper

Clear Ornaments

Confetti Mix (I used a combination of confetti from my local craft store)

Ribbon


Check out this video for the step-by-step tutorial:


If you create this project, I’d love for you to tag me @lissaanglin when you share it so I can see your beautiful creations!

 
Pinterest-min.gif

5 reasons a cricut makes a great gift

CRAFTSlissa-anglinComment
IMG_7651.JPG

I KNOW that a Cricut machine is on more than a few of my friends’ gift lists this year- and if that’s you- this post is not for you. :)

BUT- if you are one of those friends’ spouses or family or really wonderful friends- or you’re on the fence about whether or not you want to buy a Cricut- this post is for YOU!

I couldn’t understand what all the rage over Cricut was about when I first heard about them- was it just to cut out shapes or what? And then I started going down the YouTube Cricut craft video hole (I actually have a few here if you want to check them out!), and I was sold.

And now, I own the Cricut Air 2, Cricut Joy, and quite a few other Cricut products….let’s just say my craft closet could just be called my Cricut closet. :)

So- because I love a good list- here are my top 5 reasons a Cricut machine makes a great gift.

CricutGiftList2.png
  1. You’ll use it for more than you think. At first I thought a Cricut machine was just for cutting out things and making little cards, etc.- which it is, BUT THEN I realized I can make all sorts of amazing things with vinyl- signs and gifts, tshirts and home decor- you name it- you can probably make it with a Cricut. It can also cut a huge variety of materials including chipboard, acetate and even leather! Hellooooo cute leather earrings!

  2. The software is super intuitive. If you’re intimidated by the computer/technology part, don’t be. The software itself is very intuitive and there are many tutorials online where you can learn. Plus, the Cricut design space offers lots of free fonts and design elements that help you put together the perfect project.

  3. It makes everything more special. I don’t know about you, but I LOVE a gift that has been customized. Seeing my name (since it’s not very common) on something just makes it that much more special, and you can personalize EVERYTHING with a Cricut.

  4. Very user-friendly. Did you know Cricut has a phone app? This means you don’t even need a computer to use it! I keep my Cricut Joy on my desk because it’s small and compact, and it connects via bluetooth so literally all I have to do is open it and start cutting!

  5. It’s just fun! Let’s be honest- if you are a maker of any sort, you do it because it’s just fun. I consistently go back to Cricut projects because it so easy to make a quick, good-looking product that I enjoy creating.

Cricut regularly has specials on their new bundles and is consistently releasing really cool new products for different applications.

If I were just getting started, here’s what I would get:

Cricut Explore Air 2 Bundle

This bundle is going to get you started on all the basics. It can cut up to a 12 inches wide and a 100 different materials!


If you’re looking for something a little more compact, the Cricut Joy has become one of my go-tos! I use it more often than my Air 2 because it is just so covenient!

Cricut Joy

This little guy is perfect for quick, smaller projects like labels, stickers and cards. I have found SO many uses for it! Plus, it’s small and can easily have it’s home on a desk without taking up too much space. At a lower price point than the Explore, it’s a great starter machine.

Don’t forget to grab some:

Vinyl

Accessory Tools (worth it, I promise)

Transfer Tape

Cutting Mat

or just grab this great bundle of accessories!

This post contains affiliate links, which means I earn a small commission when you use my links to shop! Those little commissions add up to more fun content created here for you- which I sooooo appreciate.

things my adopted daughter has taught me

Adoptionlissa-anglinComment
Rhubarb-5074-Edit.jpg

In the course of the almost 3 years our youngest, who was adopted from China at age 2 1/2, has been home, I have heard some iteration of the phrase “she’s so lucky” many, many times. While I believe that the heart of this message houses good intentions, it’s terribly incorrect. Adoption begins in trauma- a separation of parents and children…mother and daughter…that bond which I so cherish as a mother is broken- right from the start. So, no…she’s not lucky.

Rhubarb-5251-Edit.jpg

My response is usually something like “we are the lucky ones”- which is absolutely true. Shawn and I both have had many solemn moments where we find each other realizing how God’s used Lucy to bless us, teach us, and love us. So, in honor of Adoption Awareness Month, I wanted to make a list of a few of the ways Lucy has taught me….not the other way around. :)

  1. There’s a great big world to explore, and we don’t need to fear it. From the moment we received her in China, Lucy has approached every new situation wide-eyed, ready to experience it. I had anticipated some travel anxiety, possible stress from new places- but not this kid. Out of all 3 of our children, she is always the most ready to go- ready for life, adventure, and new experiences. I do believe this is part of her God-given personality, and I can’t wait to see how that passion grows.

  2. Compassion comes from paying attention. We were fortunate to get to spend time in China with another family who adopted a son from the same orphanage Lucy lived at. Those two have a bond and a shared history we’ll never fully understand, and I’m so thankful each of them exists for each other. It struck me how compassionate 2 year old Lucy could be with this sweet friend- she was always aware of his feelings and ready to offer a hug when he would cry. She’s the same today- always alert about everyone’s feelings. This has been a struggle point for me- compassion- and I know God gave me this very attentive child to teach me how to be gentle and caring when someone needs it.

  3. There’s always room for another chance. I have been so, so critical of myself and my parenting with Lucy- and in turn been critical of her. More critical, even, than with our biological kids if you can believe it. I confess this because there have been so. many. times. that I’ve just plain had to start over. Ask forgiveness. Remember my own Heavenly Father and the forgiveness He’s forgiven me, and try again with Lucy. And guess what? She’s forgiven me every time. And she still likes me, even when I’ve given her plenty of reason not to.

  4. I am the daughter of my Heavenly Father. I had head knowledge of my belonging in God’s family- and wonderful experiences to deepen my faith up until Lucy came home, but seeing her face here in our home…enjoying all the special things about her…understanding her past, present and future- ya’ll…there is nothing that drives it home like watching real-life adoption from this perspective. The ways in which I question God’s love for me are so silly when I compare it to the ways that we love Lucy- and God’s love for me is far greater!

    “He came to set free those who were under the authority of the law. He wanted us to be adopted as children with all the rights children have. 6Because you are his children, God sent the Spirit of his Son into our hearts. He is the Holy Spirit. By his power we call God Abba. Abba means Father. So you aren’t a slave any longer. You are God’s child. Because you are his child, God gives you the rights of those who are his children.” Galatians 4:5-7

  5. I’ll never be enough for her. Woo, this is a tough one. I referenced it earlier, but there have been a LOT of mistakes and asking for forgiveness on my part. If I had any sense of a “savior complex”, it’s been attacked and torn down, brick by brick (as it should be). Every time I fail, every time she is willing to trust me after I fail- I am reminded that we are both in the care of the most perfect Father- who loves us both more than we could ever love each other. That our needs can ultimately only be met in Jesus. That I am just stewarding my children on this Earth- destined to fail, but already guaranteed a glorious redemption. That’s great news.

Rhubarb-5182-Edit.jpg

Reading back through this list, I’m realizing that only one of these things really has anything to do with the way Lucy came into our family- adoption. And there’s beauty in that, ya’ll. It’s proof that God gave us this petite, smiley miracle on purpose. That He foresaw us struggling together and learning from each other- and decided it was good. Adoption is the way that Lucy came into our family- but day-to-day, she’s just our kid. I can’t imagine life without Lucy Fei. This list is just a speck of the things I’ve learned from her, and I can’t wait to keep doing this life with her. Thank you Father for Lucy Fei!

holistic health with covenant children's

LIFESTYLElissa-anglinComment
IMG_6816.JPG

When I was in high school, I wanted to be an art therapist. Ever heard of that? It’s basically a clinician that uses visual art and art practices to promote healing and healthy mental and emotional expression for patients undergoing care at a hospital. Pretty cool, right?

I also have a few friends that are Child Life Specialists- and let me tell you- they are special people who do a very important job. Child life specialists are trained professionals who help children cope with the stress and uncertainty of illness, injury, disability, and hospitalization. These Specialists enter the hospital room with the knowledge and understanding that people need more than physical help to heal- and they also provide the resources patients need to take care of their mental, emotional and spiritual needs.

Did you know Covenant Children’s employs Child Life Specialists specifically there to help with these things?

  • Preparation for medical procedures, tests or surgeries

  • Developmentally appropriate education about diagnosis, treatments and medical environment

  • Assistance with developing coping strategies, distraction and/or support during stressful events

  • Opportunities to explore real medical equipment through medical play

  • Developmentally appropriate activities and toys for patients

  • Support and education geared toward siblings of hospitalized patients

  • End-of-life support to patient and family as well as bereavement support for family members

  • Celebrations of birthdays, medical milestones, and holidays

You can check out more about Covenant’s Child Life Specialists here.

I think that is pretty cool! I want to teach my children to recognize their need for health not only in their physical bodies, but in their thoughts and emotions as well. I believe it’s going to be very important for my children’s generation to understand how to manage their minds in a world that is constantly overwhelming them with information.

I also want them to take charge of their own health- and I believe that a holistic approach to health is so important. I have seen how my own stress and anxiety has affected my physical and mental/emotional health, and so it’s a top priority to help my children process their own feelings and thoughts. I want them to have the skills they need to cope with the hard things in life, but also be able to celebrate the good!

I love knowing that when we visit Covenant Children’s, the people caring for my kids have the same philosophy- and that they’re not simply looking for a physical healing, but want to encourage mental, spiritual, and emotional health as well. They’ve incorporated Integrative Care, which provides “developmental, educational, and expressive opportunities through play and the creative arts to help our children and families better cope with illness, hospitalization, and recovery.” More info on their Integrative Care here.

We’re so thankful that a specialized hospital like this is just a mile away from home- and that they’re providing top-level care to the region. It brings me a huge sense of security to know where we’ll go and that we’ll be receiving excellent care when we have a need.

How do you teach your children to care for their mental and emotional health? I’d love to hear!

IMG_6814.JPG


#anglinabode kitchen + coffee bar inspo

HOME + LIFESTYLElissa-anglinComment
IMG_5601.JPG

SO EXCITED to share my vision for the #AnglinAbode kitchen and coffee bar area. First things first- our home is a Chicago brick home built in 1942, which I actually like- there are a lot of warm oranges- and that plus the xeriscaped front yard has always given me a southwest/desert vibe.

For the past several years, I have embraced more of my Texan roots and incorporated desert-style decor into our home. That, coupled with a visit to the Southern California desert earlier this year made me really want to lean into the Modern Desert feel with this home.

Of course, my mid-century-loving heart is still very much alive and so you can expect this home to have a little bit of everything- we can call it Mid-Mod Desert Eclectic. :)

Since we’ve gutted the kitchen and removed some walls, we decided to also put in a coffee bar into one corner of this open-concept space. Here’s what the kitchen is looking like so far:

Kitchen Inspo by Lissa Anglin

I grew up in a home that had saltillo (or terracotta) tile, and when we walked through this house, that idea just fit and the tile is very budget-friendly for the large space we are needing to cover.

Links:

Saltillo Tile (we purchased this locally)

Black Quartz Composite Double Sink

Gold Kitchen Faucet

Gold Bar Pulls

California Dream Quartzite (purchased through Stone Crown locally)

Globe Pendant Lights

Paint Colors:

Sherwin Williams Pure White

Sherwin Williams Relentless Olive

We are planning to do shaker-style cabinets in Sherwin Williams Pure White with gold bar pulls. I liked the detail on these pulls and they are nice and heavy feeling. The island we will paint Relentless Olive- I saw this green and read the name…and I just knew we had to use it. I think it will be a great way to balance the red-orange of the floor.

Very, very excited about the black sinks we have purchased- my parents renovated and installed black sinks and I loved the durability and the fact that they will hide stains well. We are including a smaller sink in the coffee bar, and I am so excited knowing that I won’t be bleaching out coffee stains constantly.

The pendant lights were the big splurge in the kitchen, and I’m glad I went for the ones I really wanted. They are a slightly lighter gold than the rest of the fixtures I have purchased, but my mom and I have a plan to remedy that soon.

Lastly, let’s talk countertops. We made a trip out to Stone Crown here in Lubbock which is owned by our friend Scott, and he educated us on the differences between granite, quartz, and quartzite. We went in thinking we’d be doing quartz, which is a man-made product, and extremely consistent in look and durable because of that. Granite was a no-go for me- just wasn’t the look I wanted, and quartzite I had never heard of. Scott told us that essentially, quartzite is a natural product so it has the organic colors and lines I was looking for, plus it is extremely durable. Previously it has been a very expensive product, but in recent years the cost has become comparable to quartz- and Scott was able to find us a slab that was in our budget and just beautiful. The color is called “California Dream” and it is a light grey with some interesting subtle green veins, which I think will pick up the island paint color nicely.

Ok, on to the coffee bar!

Coffee Bar by Lissa Anglin

Links:

Sconces

Chandelier

This was a compromise for me. I had ooohed and aaahed over this West Elm one, but could not justify the price. In the end, I found this one and I think I actually like it better! The straight (not-angled) bars on this chandelier create a more peaceful feeling than the West Elm (more sputnik) one, and we need all the peaceful feelings we can get in our home. I’m so glad I went with the one I did.

Black Quartz Composite Sink

Gold Faucet

Ice Maker

Guys, I cannot in good conscience tell you to purchase this ice maker from Amazon, which is what I linked here. We purchased it originally on Amazon and I’m not kidding- we had to return it 3 (yes, THREE) times because there was damage to the machine. So, we ended up finding one at a store a couple of hours away and picking it up to ensure there was no shipping damage. UGH.

Refrigerator Drawers

The ice maker and fridge drawers are the most bougie purchases we have made so far, but I do believe they will make this little area one of the most popular spots in our home! With 3 kids, I’m excited to have a place to put drinks for them that they can access themselves.

I also plan to paint all of the coffee bar cabinets Relentless Olive green. Since it is a separate space from the main kitchen area, and I want it to be a bit more cozy, I am hoping the color will add interest and an intimate feeling.

Hope you enjoyed my little inspo tour! There’s a lot more on my Pinterest board if you want to follow me there!

Check out my #AnglinAbode Kitchen + Coffee Bar Pinterest Board!

so...what do we do with our sadness?

MOMLIFElissa-anglin4 Comments
sadness.jpg

I found myself asking my 9 year old son this a few days ago at bedtime. It was a genuine question I had for him- not necessarily because I had the “right” answers for him, but because I was actually interested in what he had to say about it.

Earlier that night my husband felt the knots grow in our stomachs as we watched a Facebook video in which a mourning father explained the recent death of his 12 year old son- who’d taken his own life in an outburst over the breaking of a video game monitor, which was also his only access to friends during quarantine. It broke our hearts, and hit too close to home as our boy, too, enjoys spending time with his friends playing online games- one of the only “safe” ways to socialize during this pandemic.

I’m not here to comment on screentime, gaming, or how to manage all of that. It’s something else I’m more concerned about- the thing I’ve been most worried about during the COVID-19 crisis- our mental and emotional health, and the toll that extreme isolation and loneliness can take on literally everyone impacted— it’s essentially its own virus.

I would not have even the brain cells to ponder these things had I not been in therapy (or counseling- call it what you will) for the past year or so. I’ve been in a constant state of practicing the recognition of my own feelings- yes, actually naming the feelings I feel is something I’ve had to work on like a hobby- because it just hasn’t come naturally. You could say this Enneagram 3 is a really good feelings stuffer.

I’ve become acquainted with sadness, and it’s just the worst. Sadness is a feeling we feel- and really, I can’t find any perks about it- other than that it ends eventually. I’ve learned that sometimes sadness turns into anger, and is displayed in various ways. Sometimes it manifests itself in addictions and indulgences…anything that will dull the pain— and no matter what, it requires a response. As in, “No, Lissa, it’s not going to go away if you just pretend it’s not there”.

Anyway, I’m realizing that this sadness- we all feel it. And I’m also realizing that others, like myself, may not know what to do with it. So, because I like to think I am in control, and I like to have a plan…I’ve been asking myself and my family “so what do we do with our sadness?”.

I’m writing this post because I want you to ask yourself the same thing. Because you are important. Because you are loved. And you don’t deserve to let sadness overtake you. We— as in PEOPLE— need each other. And often we need each other to cope. But if we don’t recognize the sadness, and we don’t call it out…what will become of us?

Here are some of my answers to this question. I hope yours are a bit different- because no two people are alike and the God I believe in is big enough to handle that. But alas, here are mine:

  1. Recognize the sadness. Say it to myself and then out loud to another human- “I am feeling sad”. Don’t negate it. Don’t apologize for it.

  2. Allow myself to sit with the sadness for a bit. Not as a victim- as a survivor who knows it is a temporary state.

  3. Pray about it. Find a scripture that brings me hope and go back to that scripture. Pray the scripture and ask the Lord for help. There are so many great scriptures- like this one- “The LORD is close to the brokenhearted and saves those who are crushed in spirit.” Psalm 34:18

  4. Tell some family members and close friends about it so they can pray for me. Ask them to check in. Even after I say I’m “fine”. It’s my job not to lie about my true feelings to them.

  5. Continue with counseling. It’s a free space to say whatever I want without judgment, but also a great place to learn a thing or two.

I plan on asking this question every now and then to my kids. I want them to know what to do when sadness comes to visit. Because it will. I want them to know it’s ok to be sad, and where to go and what to do when they feel that way.

Please also hear me say this- I believe that sadness is different from depression- and that depression is a clinical condition that can be helped with many methods including therapy and medicine. Please, if you feel you need to, seek help- if even from a friend who can get you to the right place.

Again, I am no expert- just a mom who has seen our world become very isolated and lonely in the past few months. Sadness has swept over us like a fog- keeping us from seeing and knowing and laughing with each other. This is me embracing that sadness, which is probably most definitely my least favorite feeling- unless it’s coupled with fear, it’s super rude cousin. If you’ve made it this far- know I love you and I’m not the only one.

demo time!

AnglinAbode, HOMElissa-anglinComment

Demo on our house started just a couple of days after we closed, and if you read my previous blog post, you’ll know I was DYING TO SEE what laid beneath those two walls in the kitchen I wanted to take out.

If they were structural walls, it meant we’d need to add a big beam and pay all the dollars for it. If not, no beam and fewer dollars.

Well low and behold, we arrived shortly after closing to see this:

IMG_3262.jpg

It was, unfortunately, load-bearing. And the wall removal also revealed that there had been at least 2 other renovations on this poor home.

The built-in shelves which many people loved when I gave a tour on Insta were the first to go (sorry!).

Once we faced the music about having to put in a giant beam (and how much that would cost), demo continued.

IMG_3266.jpg

The front bedroom floors were ripped up to reveal plywood. This room will get new hardwoods.

IMG_4650.jpg

The ugly brown hallway tile was removed and so were the other shelves in the hallway that will eventually become the mudroom cubbies.

One day we pulled up and this was sitting in our driveway:

IMG_4117.jpg

Which only means one thing: beam time!

Here’s the before with all the walls/cabinetry removed:

IMG_4110.jpg
IMG_4111.jpg

And then in an afternoon, it was done!

IMG_4123.jpg
You can see here that they actually had to install 2 beams, as these 2 walls were originally exterior walls of the home.

You can see here that they actually had to install 2 beams, as these 2 walls were originally exterior walls of the home.

You can see that it really opened up the area!

You can see that it really opened up the area!

Below is the new laundry room- former sitting area off the master. The door in the back is our master closet. Master bedroom is to the right, and we sheetrocked over another door that went into the front bedroom closet, so I can build storage there later. The mudroom cubbies will be on either side of the door (currently open).

IMG_4475.jpg
Here is the door we closed up. There was really no reason for it to be there, and it will allow me some extra storage space on both sides.

Here is the door we closed up. There was really no reason for it to be there, and it will allow me some extra storage space on both sides.

Here is the new pantry with the old door I refinished for the entry into the pantry. I wanted something old/rustic as everything else will be new, and they are going to frame it out in the center of the pantry.

IMG_4477.jpg

A great surprise- they discovered original hardwoods in our master bedroom! We were super excited about this but they are an inch or two lower than the other floors that lead into that room, so I’m interested to see how that works out.

IMG_4470.jpg

This will be where the beverage bar is going. You can see they are working on the electrical here- they also had to add plumbing for the sink and ice maker. Another challenge is that I wanted base cabinets literally right over that huge AC vent. Thankfully, our cabinet maker is going to build it into the cabinets so we don’t have to relocate it and it can still be functional (and less of an eyesore).

IMG_4651.jpg

Hope you enjoyed seeing our bare naked home! Haha! Already walls are getting put back together so stay tuned for more updates soon!

initial design sketches for the Anglin Abode

AnglinAbode, HOME, HOME + LIFESTYLElissa-anglinComment

I’m excited to share my initial design sketches with you for the #anglinabode! These are the initial sketches I handed our contractor. I literally just drew them up over the listing photos and was like, “can you make this happen?!”. Haha, thankfully they have been great to work with and listened to all of my design concerns.

I mentioned in my first post about our new home that the first time we walked through it I was like


But then once I went home and had some time to really think about the layout, what I liked and hated about the house, a vision began to grow.

I started sketching and got really excited about the potential. Of course, everything was riding on the idea that we could renovate. Once I had a vision for the property, I couldn’t picture it working out for our family without the changes- and without the changes, I wasn’t interested in buying the home. So the reno was key. It had to happen.


Prepare yourselves, I’m feeling very GIFy today.

After talking it over with Shawn, we decided we’d want to re-do the kitchen and main living space, create a new laundry room, and re-do all the bathrooms. So yeah, pretty much the whole house- not to mention some exterior changes we’d like to make.

We decided to start with the kitchen, main living, and flooring and MOVE IN WITH MY PARENTS until those were done. Ya’ll, my parents might be the most patient and gracious people I know. We’ve been living with them for about a month now and I know they have earned some extra crowns in Heaven these past few weeks. :)


Let’s walk through some of the pain points and potential solutions:


LissaAnglin_PartofMeBlog_0077.jpg

Problem: SO MANY different types of flooring. There were original hardwoods in some of the rooms, carpet in others, and laminate flooring. Having so many different flooring types is a pet peeve of mine- and I don’t like carpet, either. In our last home, we ripped up all the carpet and installed laminate which made a huge difference.

Solution: Tile and refinishing the original hardwood, putting in new hardwood. Since I’m not a fan of carpet (rugs allll the way for me! Washable, replaceable, and hard flooring lasts way longer), I decided to do tile in the main entry hallway and kitchen/main living area, along with the new laundry room. 2 of the 4 bedrooms did not have the original hardwoods that the others did, so we planned to install matching hardwoods there. Flooring consistency achieved.

320822ndSt-8861.jpg

Problem: Kitchen was too closed off. The kitchen in this home had undergone a renovation not too many years ago, but it just wasn’t our style, and I didn’t feel it would function very well for us the way it was. Originally it must have been a closed in room, but had been opened up a bit to create a u-shaped layout with a bar. It wasn’t bad, but I really wanted to see it with a standalone island. So, I drew up this sketch:

IMG_0516.JPG
IMG_0517.JPG

Solution: Knock those walls down and create a 1-wall kitchen with an island. Here, we are getting rid of the wall that connects to the main hallway, and converting the current bar area into an island. This part of my plan was the thing I was most nervous about- we wouldn’t know whether this wall was load-bearing (which it likely was) until after we purchased the home. If it was, a beam would have to be put in and could be a large budget item.

I was pretty adamant on making the walls disappear so that the overall space would be a lot more functional and inviting for us, as we’d have more seating around a bar and the flow of the kitchen would work better. As it was, there was only room for 2 people, and 1 way in and out of the space.

Here’s a more updated sketch of the kitchen- in this sketch the island is flipped around so you can see the appliances- the side that is showing will actually be facing the kitchen wall. I’ve already changed my mind on a couple of things, so there will be tweaks.

IMG_0519.JPG
You can see the pantry here to the left of the fridge.

You can see the pantry here to the left of the fridge.

Problem: TINY pantry. Yall, this pantry space was wide, but only about 6 inches deep. It was laughable. There was NO way our family of 5 could contain all our snacks in there.

You can see the pantry already opened up to the closet behind it in this image.

You can see the pantry already opened up to the closet behind it in this image.

Solution: Open up the pantry to include the closet from the front room. The pantry solution was wonderfully easy- there was a closet right behind it that opened into the front living room. We decided to close it up and use that space to make the pantry larger. Yay!

The laundry room is located through the right door in this photo.

The laundry room is located through the right door in this photo.

Current laundry situation. That’s our Christmas tree, not a body bag, haha.

Current laundry situation. That’s our Christmas tree, not a body bag, haha.

Problem: Laundry area was inefficient. Ya’ll, I don’t love laundry, but I especially don’t love laundry if I feel like I am in exile while doing it. The placement of the laundry room had been moved a couple of times, it seemed, as this home has been added onto (we can count at least 3 renovations this poor home has already endured!), and currently, the laundry room was off the master bedroom. It had an exterior door- why? Who knows. No storage. Behind that door is the water heater. And to get to it, you have to go through the master bedroom. Plus, it took up space. If we moved it, we could DOUBLE the size of our master bathroom. Yes, please!

Current sitting area off the master- future laundry room!

Current sitting area off the master- future laundry room!

The other side of the new laundry room. This bookshelf will be made into a doorway that opens to the main hallway, so now you don’t have to go through the master to get there.

The other side of the new laundry room. This bookshelf will be made into a doorway that opens to the main hallway, so now you don’t have to go through the master to get there.

Solution: Move the laundry room. Am I crazy? Yes. Right off of the master bedroom, there was a little sitting area. Initially I imagined using it as space for a vanity or comfy chair- but then I realized it would be a perfect laundry room. If we were able to open it up to the hallway, it would be easily accessible but wouldn’t require a trip through my bedroom. And, it would be more centralized in the home. Plus, I’d be able to add storage and a sink. Having a sink in my laundry room is something I have always looked for- since I do so much painting and other creative projects, I like having a sink to wash out brushes, etc. that isn’t the same sink I do dishes in. A caveat to this is that our master closet is connected to this room, but not our master bedroom, so we’d have to also have a door to our master bedroom. I am excited about this, however, because I think it will actually make doing laundry easier since our closet is right off the laundry!

This area of our house which I am calling the main living area is actually an old patio that was enclosed. Because of that, there is no attic space here nor overhead lighting.

This area of our house which I am calling the main living area is actually an old patio that was enclosed. Because of that, there is no attic space here nor overhead lighting.

The old owners installed these very interesting light fixtures (you can see them over the windows and the door) that I couldn’t wait to see go. I also felt this back corner really needed something to define the space.

The old owners installed these very interesting light fixtures (you can see them over the windows and the door) that I couldn’t wait to see go. I also felt this back corner really needed something to define the space.

Problem: Lots of space with no function. I love a well-designed home, and if you don’t know by now, I care A LOT about the function of the home, as well as the visual style. So, in envisioning our main living area, I saw a lot of space without a lot of function. It was missing overhead lighting, and I wasn’t sure what the furniture configuration would look like.

IMG_0520.JPG

Solution: Add cabinets to create storage and define the space. Because we were losing some cabinet space when we opened up the kitchen, I thought it would be fun to add some cabinetry to the back corner of this main room. You see this corner upon entering the home, and it would help designate a dining space for the room. So our “beverage bar” was born! My sketch here includes L-shaped cabinets, open shelving, outlets for coffee makers, etc. and a small sink. We also got a little bougie and included a nugget ice maker and refrigerator drawers for sodas, beer, etc. I am really excited about this little area and hope it becomes an easy entertaining space for us and our kids. I plan to put our dining table in this corner.

320822ndSt-8845.jpg

Problem: No mudroom/inefficient shelving. When we first toured the home, I loved the built in shelving that was at the end of the main hallway. However, I didn’t love it as much as I loved the concept of a more open kitchen. In order to open up the kitchen we had to lose the shelves on the right side. The other side of shelving had one bookcase-style shelf, and one magazine-rack style shelf. I am sure I could have come up with a creative solution for those magazine racks- but I really wanted them to be more useful.

IMG_0521.JPG

Solution: Make them into storage/Mudroom type shelves! I designed 2 symmetrical areas on either side of the new laundry room door. They will have an enclosed cabinet up top, hooks in the middle, and cubbies for shoes in the bottom. So excited to see these come together!

320822ndSt-8875.jpg

Problem: Ugly fireplace area. I loved the storage, shelving, and fireplace here, just not really anything else. The fireplace insert is not one I would have chosen, nor is the mantle or cabinetry style. So, this area is going to get some cosmetic touch ups.

IMG_0515.JPG

Solution: Lengthen the mantle and reconfigure the shelves. I love a good mid-century mantle, so I have a 10’ one planned for this space. I am hoping to adjust the middle shelving unit so that I can put a TV over the middle and still get to decorate over the fireplace.

There are lots of other little changes happening within these BIG changes, so I’m hoping to do some close-ups on them as they get completed. Tell me- what do you think of my plans? Which solution is your favorite? I can’t wait to see this home look cohesive, beautiful, and functional.


I’ll take the mid-century goodness without the housewifey-ness, please!